Setting up Qt Creator for QNX Neutrino OS: Difference between revisions
No edit summary |
(Cleanup) |
||
| (5 intermediate revisions by 3 users not shown) | |||
| Line 1: | Line 1: | ||
{{LangSwitch}} | |||
[[Category:QNX]] | [[Category:QNX]] | ||
[[Category:HowTo]] | [[Category:HowTo]] | ||
== Overview == | == Overview == | ||
The QNX plugin is available in Qt Creator since the version 2.6. It provides support for application development for BlackBerry 10 smartphones as well as for QNX Neutrino OS on embedded devices. | The QNX plugin is available in Qt Creator since the version 2.6. It provides support for application development for BlackBerry 10 smartphones as well as for QNX Neutrino OS on embedded devices. | ||
You can download a recent Qt Creator release version via this | You can download a recent Qt Creator release version via this [http://download.qt.io/development_releases/qtcreator/ link]. | ||
The QNX plugin is under constant development. Many improvements and bug fixes did not make into the recently released 3.1 version. If you want to try a cutting-edge Qt Creator build that contains latest features and bug fixes in the QNX plugin, you can consider downloading a snapshot build via this | The QNX plugin is under constant development. Many improvements and bug fixes did not make into the recently released 3.1 version. If you want to try a cutting-edge Qt Creator build that contains latest features and bug fixes in the QNX plugin, you can consider downloading a snapshot build via this [https://download.qt.io/snapshots/qtcreator/master/ link]. | ||
A few generic topics on this page overlap with the [[QNX-App-development-and-deployment | Qt application development and deployment on QNX]] page which focuses on the command line use case. | A few generic topics on this page overlap with the [[QNX-App-development-and-deployment | Qt application development and deployment on QNX]] page which focuses on the command line use case. | ||
| Line 33: | Line 29: | ||
=== Add the Qt version === | === Add the Qt version === | ||
You add the Qt version by selecting '''Tools -> Options-> Build & | You add the Qt version by selecting '''Tools -> Options-> Build & Run > Qt Versions -> Add''' and set the path to "qmake" in your Qt for QNX build. You also need to specify a path to the QNX SDP installation to let Qt Creator to validate the newly added Qt version: | ||
https://raw.githubusercontent.com/blackberry/Qt/master/screenshots/qnx/qtcreator-qnx-qt.png | |||
This won't be required in the future releases of Qt Creator. If you are using a Qt for QNX installer with integrated Qt Creator build, the new Qt version for QNX will be detected automatically and added to this Qt Creator installation. | This won't be required in the future releases of Qt Creator. If you are using a Qt for QNX installer with integrated Qt Creator build, the new Qt version for QNX will be detected automatically and added to this Qt Creator installation. | ||
| Line 41: | Line 37: | ||
=== Add the QCC compiler === | === Add the QCC compiler === | ||
Select '''Tools -> Options-> Build & | Select '''Tools -> Options-> Build & Run -> Compiler-> Add -> QCC''' and set the path to the qcc compiler ('''<qnx660_path>/host/<OS>/x86/usr/bin/qcc'''). Since qcc depends on some QNX specific environment variables, you need to specify the path to the QNX SDP installation as well: | ||
https://raw.githubusercontent.com/blackberry/Qt/master/screenshots/qnx/qtcreator-qnx-compiler.png | |||
=== Add a debugger === | === Add a debugger === | ||
Select '''Tools -> Options-> Run & | Select '''Tools -> Options-> Run & Build -> Debugger''' and set the path to the '''ntoarmv7-gdb''' debugger ('''<qnx660_path>/host/<OS>/x86/usr/bin/ntoarmv7-gdb''') or '''ntox86-gdb''' if you're targeting x86: | ||
https://raw.githubusercontent.com/blackberry/Qt/master/screenshots/qnx/qtcreator-qnx-debugger.png | |||
=== Add QNX Device === | === Add QNX Device === | ||
| Line 55: | Line 51: | ||
Select '''Tools -> Options-> Devices -> Add-> QNX Device''' to register your QNX device in Qt Creator. | Select '''Tools -> Options-> Devices -> Add-> QNX Device''' to register your QNX device in Qt Creator. | ||
https://raw.githubusercontent.com/blackberry/Qt/master/screenshots/qnx/qtcreator-qnx-device.png | |||
=== Add a kit === | === Add a kit === | ||
Select '''Tools -> Options-> Build & | Select '''Tools -> Options-> Build & Run -> Kits-> Add''' to add a new kit that uses the QNX device, the Qt version , the compiler and the debugger your setup during the steps above: | ||
https://raw.githubusercontent.com/blackberry/Qt/master/screenshots/qnx/qtcreator-qnx-kit.png | |||
== Compile and Deploy == | == Compile and Deploy == | ||
Compiling and deploying applications for QNX is very similar to how it is done for "Remote Linux" devices, see the Qt Creator manual for more information via this | Compiling and deploying applications for QNX is very similar to how it is done for "Remote Linux" devices, see the Qt Creator manual for more information via this [http://doc-snapshot.qt.io/qtcreator-3.1/creator-deployment-qnx.html link]. | ||
=== Pointing to the Qt runtime on the target === | === Pointing to the Qt runtime on the target === | ||
| Line 85: | Line 81: | ||
The '''QQNX_PHYSICAL_SCREEN_SIZE''' environment variable is QNX specific and defines the height and width of the app's display area on the screen in millimeters: | The '''QQNX_PHYSICAL_SCREEN_SIZE''' environment variable is QNX specific and defines the height and width of the app's display area on the screen in millimeters: | ||
https://raw.githubusercontent.com/blackberry/Qt/master/screenshots/qnx/qtcreator-qnx-environment.png | |||
If your build does not use fontconfig you also need to point where to find the Qt fonts: | If your build does not use fontconfig you also need to point where to find the Qt fonts: | ||
| Line 92: | Line 88: | ||
</code> | </code> | ||
=== | === Application deployment === | ||
The simplest way to deploy an app on a target is to copy its binaries into a remote folder. Qt Creator does all this for your. You just need to make sure that the destination folder is correct and is writable. | The simplest way to deploy an app on a target is to copy its binaries into a remote folder. Qt Creator does all this for your. You just need to make sure that the destination folder is correct and is writable. | ||
| Line 116: | Line 112: | ||
Put the above "qnx" instructions below such a line. | Put the above "qnx" instructions below such a line. | ||
=== | === Tools provided by the QNX SDK === | ||
If you use '''QNX SDK for Apps and Media''', you can use the additional BlackBerry tools to package your application as a BAR file. This is pretty similar to the packaging of BlackBerry 10 applications. See | If you use '''QNX SDK for Apps and Media''', you can use the additional BlackBerry tools to package your application as a BAR file. This is pretty similar to the packaging of BlackBerry 10 applications. See [http://www.qnx.com/developers/docs/660/topic/com.qnx.doc.qnxcar2.qt.guide/topic/packaging.html?cp=1_5_3_2 this article] in the QNX developer documentation for more details. | ||
The installation of the application packaged in a BAR file on the target is explained in | The installation of the application packaged in a BAR file on the target is explained in [http://www.qnx.com/developers/docs/660/topic/com.qnx.doc.appsandmedia.lifecycle/topic/install_task.html this] article. | ||
== Using CMake build system == | == Using CMake build system == | ||
| Line 126: | Line 122: | ||
Qt Creator provides a CMake plugin to manage CMake based projects. The plugin is currently not fully functional when you want to deploy and run your application on remote targets in general by default. If you develop for QNX using CMake and Qt Creator please follow the below instructions to fix this. | Qt Creator provides a CMake plugin to manage CMake based projects. The plugin is currently not fully functional when you want to deploy and run your application on remote targets in general by default. If you develop for QNX using CMake and Qt Creator please follow the below instructions to fix this. | ||
* When you create a new CMake project using the Qt Creator, the CMake wizard won't provide any CMake generator for QNX kits. This is a known issue in QtCreator 3.1 that should be fixed in the 3.1.1 patch release. Please download a recent 3.1.1 snapshot build | * When you create a new CMake project using the Qt Creator, the CMake wizard won't provide any CMake generator for QNX kits. This is a known issue in QtCreator 3.1 that should be fixed in the 3.1.1 patch release. Please download a recent 3.1.1 snapshot build [https://download.qt.io/snapshots/qtcreator/3.1.1/ here] to skip this issue. | ||
* The default CMakeList.txt file generated by Qt Creator in the root folder of your CMake project doesn't cover the QNX platform. You either have to use an appropriate cmake toolchain file for QNX or add the following configuration lines in CMakeList.txt specifying QNX SDP 6.6 toolchain: | * The default CMakeList.txt file generated by Qt Creator in the root folder of your CMake project doesn't cover the QNX platform. You either have to use an appropriate cmake toolchain file for QNX or add the following configuration lines in CMakeList.txt specifying QNX SDP 6.6 toolchain: | ||
| Line 166: | Line 162: | ||
or another writable folder on your target. | or another writable folder on your target. | ||
'''''Note:''''' If your need to deploy additional files, your should specify them as well in the QtCreatorDeployment.txt as explained in the | '''''Note:''''' If your need to deploy additional files, your should specify them as well in the QtCreatorDeployment.txt as explained in the [http://doc.qt.io/qtcreator-3.0/creator-project-cmake.html documentation]. | ||
* The CMake plugin in Qt Creator does not support running remote executables yet, and the run configuration provides only the option to run a local executable. Thus, you need to manually add the necessary steps to run a custom executable on the target via ssh. For a QNX project, you can simply add a new '''Run custom remote command''' deploy step and specify the path to your executable in the target machine to run it during the deployment step. | * The CMake plugin in Qt Creator does not support running remote executables yet, and the run configuration provides only the option to run a local executable. Thus, you need to manually add the necessary steps to run a custom executable on the target via ssh. For a QNX project, you can simply add a new '''Run custom remote command''' deploy step and specify the path to your executable in the target machine to run it during the deployment step. | ||
Latest revision as of 10:49, 28 June 2015
En Ar Bg De El Es Fa Fi Fr Hi Hu It Ja Kn Ko Ms Nl Pl Pt Ru Sq Th Tr Uk Zh
Overview
The QNX plugin is available in Qt Creator since the version 2.6. It provides support for application development for BlackBerry 10 smartphones as well as for QNX Neutrino OS on embedded devices.
You can download a recent Qt Creator release version via this link.
The QNX plugin is under constant development. Many improvements and bug fixes did not make into the recently released 3.1 version. If you want to try a cutting-edge Qt Creator build that contains latest features and bug fixes in the QNX plugin, you can consider downloading a snapshot build via this link.
A few generic topics on this page overlap with the Qt application development and deployment on QNX page which focuses on the command line use case.
Note: The steps described in this page cover Qt Creator 3.1 feature level. If you are using a previous version, some steps might need to be done slightly different.
Getting Started
The following tools are required for development for the QNX platform using Qt Creator:
- Qt build for QNX installed on your target and on your development machine
- Qt Creator 3.1 (most steps should be valid for the version 2.6 and later as well)
- QNX Software Development Platform (SDP) 6.6 (most steps should be valid for SDP 6.5 FP1 as well)
- QNX SDK for Apps and Media 1.0 if you use SDP 6.6. This is an optional package providing additional BlackBerry tools for easy deployment and installation of applications on a target.
Setup your Qt Creator environment
You first have to manually add your Qt for QNX as a new Qt version, configure the compiler, the debugger and create the kit. In the future Qt Creator releases, QNX plugin should be able to automatically setup all these tools by just selecting the path to the installed QNX SDP.
Add the Qt version
You add the Qt version by selecting Tools -> Options-> Build & Run > Qt Versions -> Add and set the path to "qmake" in your Qt for QNX build. You also need to specify a path to the QNX SDP installation to let Qt Creator to validate the newly added Qt version:
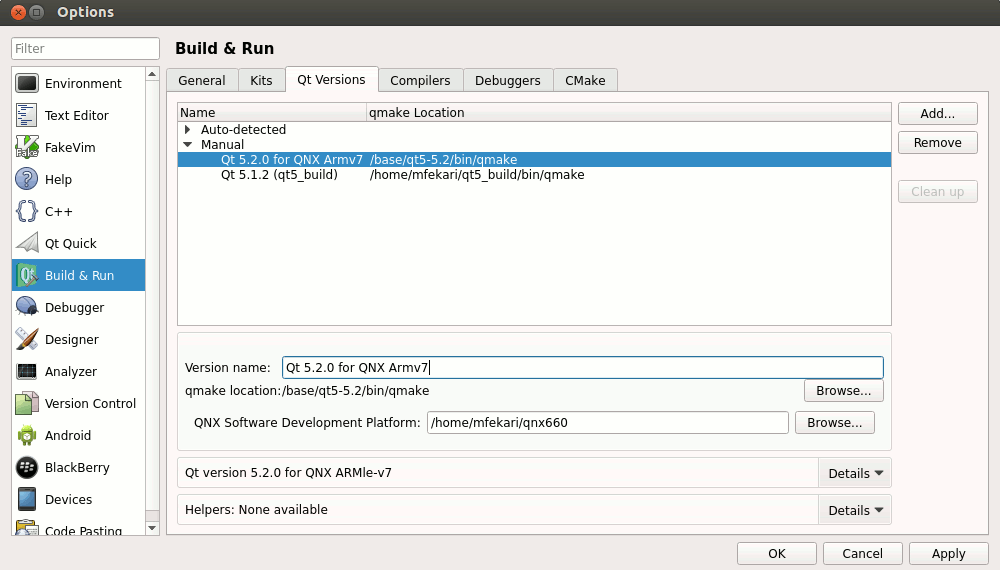
This won't be required in the future releases of Qt Creator. If you are using a Qt for QNX installer with integrated Qt Creator build, the new Qt version for QNX will be detected automatically and added to this Qt Creator installation.
Add the QCC compiler
Select Tools -> Options-> Build & Run -> Compiler-> Add -> QCC and set the path to the qcc compiler (<qnx660_path>/host/<OS>/x86/usr/bin/qcc). Since qcc depends on some QNX specific environment variables, you need to specify the path to the QNX SDP installation as well:
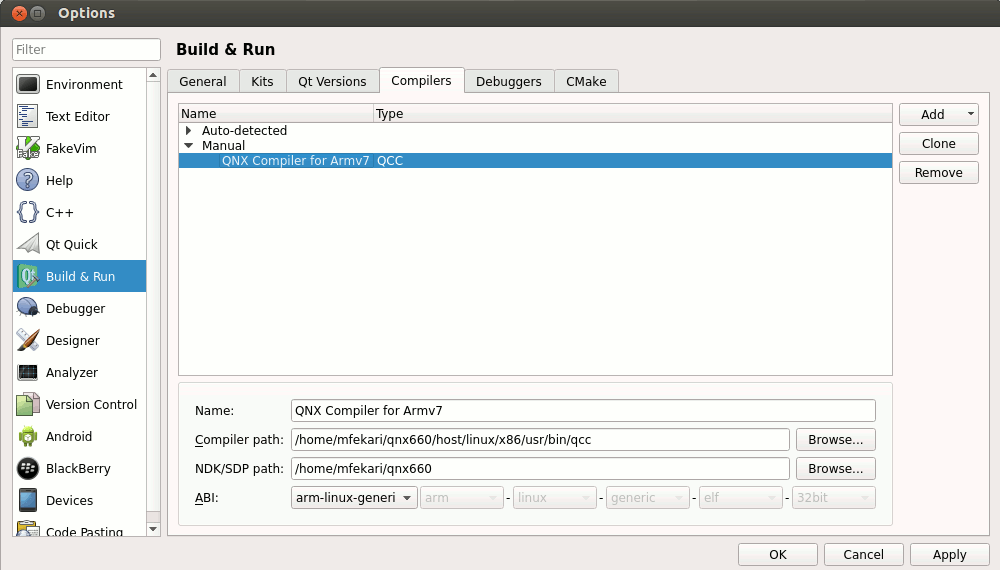
Add a debugger
Select Tools -> Options-> Run & Build -> Debugger and set the path to the ntoarmv7-gdb debugger (<qnx660_path>/host/<OS>/x86/usr/bin/ntoarmv7-gdb) or ntox86-gdb if you're targeting x86:
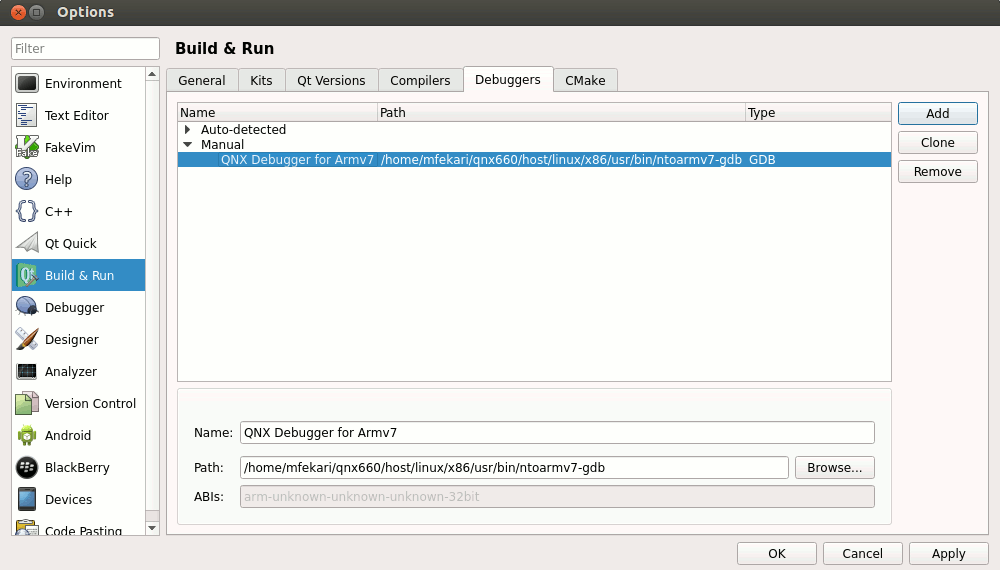
Add QNX Device
Select Tools -> Options-> Devices -> Add-> QNX Device to register your QNX device in Qt Creator.
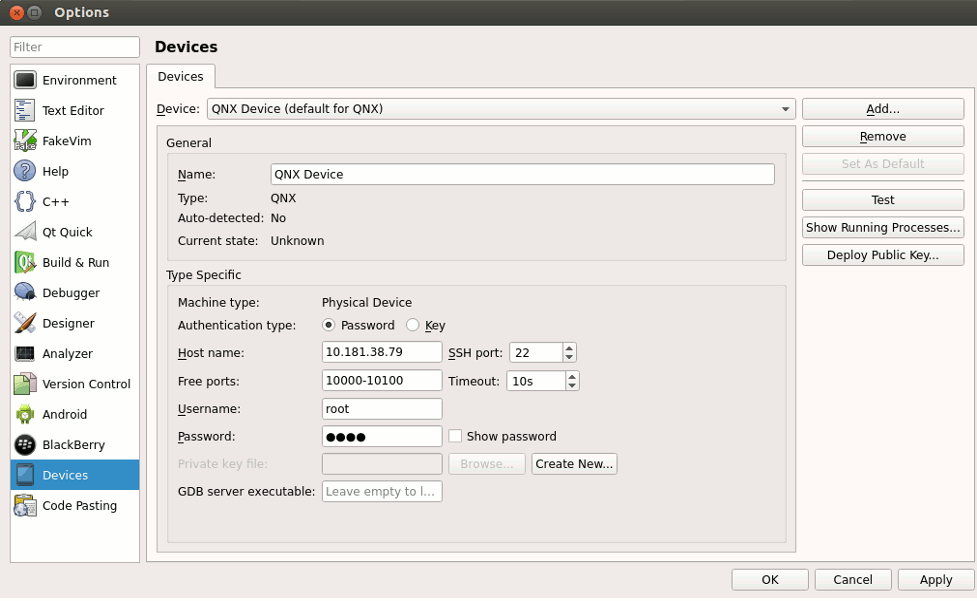
Add a kit
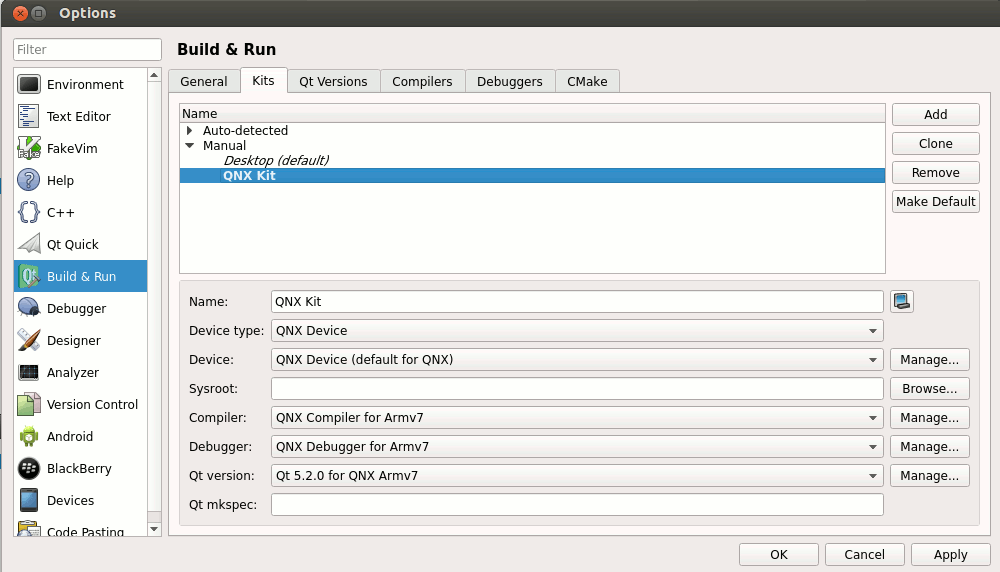
Select Tools -> Options-> Build & Run -> Kits-> Add to add a new kit that uses the QNX device, the Qt version , the compiler and the debugger your setup during the steps above:
Compile and Deploy
Compiling and deploying applications for QNX is very similar to how it is done for "Remote Linux" devices, see the Qt Creator manual for more information via this link.
Pointing to the Qt runtime on the target
When running the application on the QNX device, you might need to specify the path to where the Qt runtime is installed on the device. This is done in the "Run Settings" of your project in Qt Creator. The application will not start if this is not done, check the logs to find out if this is the case.
A Qt application can be pointed to the location of the Qt runtime by a few environment variables. Set the following environment variables:
LD_LIBRARY_PATH=/<qt_installation_path>/lib
QML_IMPORT_PATH= /<qt_installation_path>/imports
QML2_IMPORT_PATH= /<qt_installation_path>/qml
QT_PLUGIN_PATH=/<qt_installation_path>/plugins
QQNX_PHYSICAL_SCREEN_SIZE="150,90"
Note: If your target already uses some of those variables system-wide, make sure if append or prepend the new values
The QQNX_PHYSICAL_SCREEN_SIZE environment variable is QNX specific and defines the height and width of the app's display area on the screen in millimeters:

If your build does not use fontconfig you also need to point where to find the Qt fonts:
export QT_QPA_FONTDIR=/<qt_installation_path>/lib/fonts
Application deployment
The simplest way to deploy an app on a target is to copy its binaries into a remote folder. Qt Creator does all this for your. You just need to make sure that the destination folder is correct and is writable.
If your .pro file does not already contain specific deployment instructions for the QNX platform or contains instructions specific for another platform, make sure a valid target path is set as following:
#
# /tmp is mapped to a RAM drive on many devices. This means your app will be deleted after the next reboot.
#
qnx {
 target.path = /tmp/$${TARGET}/bin
 INSTALLS += target
}
Note: Most Qt examples already contain deployment instructions in their .pro files, e.g.:
target.path = $$[QT_INSTALL_EXAMPLES]/quick/example_xyz
Put the above "qnx" instructions below such a line.
Tools provided by the QNX SDK
If you use QNX SDK for Apps and Media, you can use the additional BlackBerry tools to package your application as a BAR file. This is pretty similar to the packaging of BlackBerry 10 applications. See this article in the QNX developer documentation for more details.
The installation of the application packaged in a BAR file on the target is explained in this article.
Using CMake build system
Qt Creator provides a CMake plugin to manage CMake based projects. The plugin is currently not fully functional when you want to deploy and run your application on remote targets in general by default. If you develop for QNX using CMake and Qt Creator please follow the below instructions to fix this.
- When you create a new CMake project using the Qt Creator, the CMake wizard won't provide any CMake generator for QNX kits. This is a known issue in QtCreator 3.1 that should be fixed in the 3.1.1 patch release. Please download a recent 3.1.1 snapshot build here to skip this issue.
- The default CMakeList.txt file generated by Qt Creator in the root folder of your CMake project doesn't cover the QNX platform. You either have to use an appropriate cmake toolchain file for QNX or add the following configuration lines in CMakeList.txt specifying QNX SDP 6.6 toolchain:
SET (CMAKE_SYSTEM_NAME QNX)
SET (CMAKE_SYSTEM_VERSION 6.6.0)
SET (CMAKE_SYSTEM_PROCESSOR armv7) # or SET (CMAKE_SYSTEM_PROCESSOR x86)
SET (TOOLCHAIN QNX)

IF (CMAKE_HOST_WIN32)
 SET (HOST_EXECUTABLE_SUFFIX ".exe")
ENDIF (CMAKE_HOST_WIN32)

FIND_PATH(QNX_HOST
 NAME usr/bin/qcc${HOST_EXECUTABLE_SUFFIX}
 PATHS $ENV{QNX_HOST} <path_to_your_qnx_host>
 NO_CMAKE_PATH
 NO_CMAKE_ENVIRONMENT_PATH
)

FIND_PATH(QNX_TARGET
 NAME usr/include/qnx_errno.h
 PATHS $ENV{QNX_TARGET} <path_to_your_qnx_target>
 NO_CMAKE_PATH
 NO_CMAKE_ENVIRONMENT_PATH
)

SET (CMAKE_C_COMPILER ${QNX_HOST}/usr/bin/nto${CMAKE_SYSTEM_PROCESSOR}-gcc${HOST_EXECUTABLE_SUFFIX})
SET (CMAKE_CXX_COMPILER ${QNX_HOST}/usr/bin/nto${CMAKE_SYSTEM_PROCESSOR}-c++${HOST_EXECUTABLE_SUFFIX})
- In order to deploy the application binary into your QNX target with QtCreator, you should add a QtCreatorDeployment.txt file in the root directory of your CMake project and specify the location where your binary should de deployed, e.g.:
/account/devuser/me/myApp
or another writable folder on your target.
Note: If your need to deploy additional files, your should specify them as well in the QtCreatorDeployment.txt as explained in the documentation.
- The CMake plugin in Qt Creator does not support running remote executables yet, and the run configuration provides only the option to run a local executable. Thus, you need to manually add the necessary steps to run a custom executable on the target via ssh. For a QNX project, you can simply add a new Run custom remote command deploy step and specify the path to your executable in the target machine to run it during the deployment step.