Getting Started with Qt Bridge for Figma: Difference between revisions
Qt Bridge for Figma |
|||
| (16 intermediate revisions by 3 users not shown) | |||
| Line 1: | Line 1: | ||
The following | This was moved to: [[QtDesignStudio/Getting Started with Qt Bridge for Figma]] | ||
The following guide is an introduction to the Qt Design Studio and it's integration with Figma through the Qt Bridge. The focus is on Qt for MCU project development. If you are new to the Qt Design Studio, please visit the [https://doc.qt.io/qtdesignstudio/index.html Qt Design Studio Documentation] for detailed installation instructions, getting started guide and tutorials. | |||
==Qt Bridge for Figma== | ==Qt Bridge for Figma== | ||
| Line 14: | Line 17: | ||
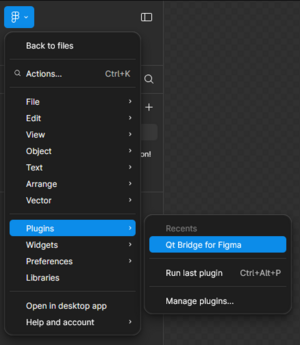
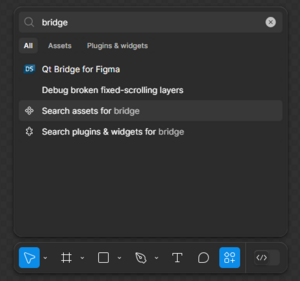
# Plugin is now available via main menu or over actions (Ctrl + K) | # Plugin is now available via main menu or over actions (Ctrl + K) | ||
[[File:Qt bridge figma main menu.png|thumb| | [[File:Qt bridge figma main menu.png|thumb|none]] | ||
[[File:Qt bridge figma actions.png|thumb| | [[File:Qt bridge figma actions.png|thumb|none]] | ||
== Advise for designing in Figma == | |||
When designing in Figma for exporting directly to QML for Qt4Mcu you have to keep the structure minimal and avoid unnecessary items because they come with a cost of memory and performance. Do not use variants to define screens that look really different. Use components instead and only change the visibility if you want to use variants. | |||
Also the number of states should not be excessive, because a large number of states (usually over 10) can impact performance and maintainability. | |||
Remember that merging layers will raster items into images during export, and memory consumption can be huge. | |||
Using opacity and scaling usually has a severe performance impact on MCU hardware | |||
==Projects for MCUs== | |||
MCU platforms have limited resource availability, so getting the most out of them is critical. | |||
To achieve the best results, we have introduced [https://doc.qt.io/QtForMCUs-2.8/qtul-overview.html Qt Quick Ultralite], which is specifically designed for embedded platforms. | |||
However, there are differences between the regular Qt library and Qt Quick Ultralite (you can read more about them [https://doc.qt.io/QtForMCUs-2.8/qtul-qtquick-differences.html here]). | |||
When working on a project for MCUs, you need to be aware of these limitations. To help you best prepare your project before exporting to Qt Design Studio, we have added a special mode to Qt Bridge for the Figma plugin. | |||
'''Note:''' To learn more about limitations, see [https://wiki.qt.io/Getting_Started_with_Qt_Bridge_for_Figma#Known_issues_or_limitations Known issues or limitations] section. | |||
===Export target: Qt for MCUs=== | |||
The MCU mode in the Qt Bridge for Figma has two main purposes: | |||
*preset plugin settings so that customization of the export process is compatible with the Qt Quick Ultralite | |||
*enable MCU-specific checks, that provide a valuable information when using properties or effects that can't be reflected in the Qt Quick Ultralite | |||
[[File:Qt bridge mcu export target.png|thumb|none]] | |||
If you want to see Qt for MCUs warnings: | |||
#Go to the Settings | |||
#Set the Export target to 'Qt for MCUs' | |||
#Select an item in Figma, that you want to verify | |||
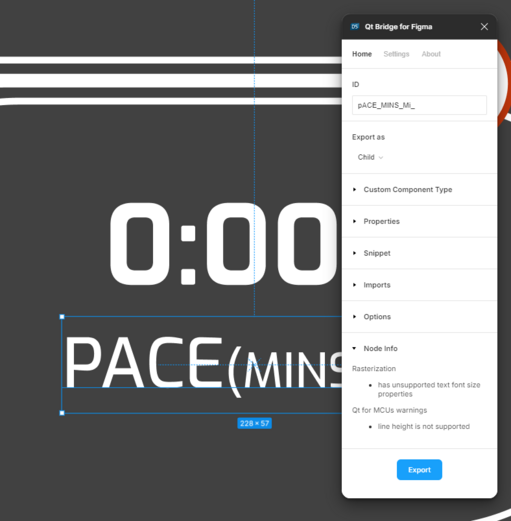
#Check Home -> Node Info | |||
'''Note:''' Node Info can also display non-MCU related information, such as rasterization tips. These are also available in a regular mode (Export target: Qt) | |||
[[File:Qt bridge node info.png|thumb|none|521x521px]] | |||
== Export Settings == | |||
Qt Bridge for Figma has a number of settings that allow end users to control the export process and customize the QML code generated in Qt Design Studio. You can find out how to use the available options by: | |||
*visiting the [https://doc.qt.io/qtdesignstudio/qtbridge-figma-using.html#export-settings Export Settings] documentation page | |||
*exploring the Figma project: [https://www.figma.com/community/file/991699001037508864 Qt Bridge for Figma Tutorial] | |||
*visiting the FAQ page: [https://wiki.qt.io/QtDesignStudio/MCU_FAQ#What's_the_difference_between_Home_and_Settings_tabs_in_the_Qt_Bridge_for_Figma? What's the difference between Home and Settings tabs in the Qt Bridge for Figma?] | |||
*checking the built-in documentation - just hover the mouse pointer over the setting you are interested in and wait for the tooltip | |||
Sometimes a particular setting may be disabled (grayed out). This means that you cannot use it in a certain context. For example: the 'Start screen' option can only be applied to the top level components or frames, 'Export As' may be disabled for instances of the components, Design Effects cannot be applied in the MCU context etc. To learn more about limitations, see the [https://wiki.qt.io/Getting_Started_with_Qt_Bridge_for_Figma#Known_issues_or_limitations Known issues or limitations] section. | |||
==Workflow== | |||
The workflow is quite simple, there are two main steps between the Figma project and the running QML-based application: | |||
#Prepare and export project metadata using Qt Bridge for Figma | |||
#Import the metadata archive into a project created in the Qt Design Studio | |||
===Exporting project from Figma=== | |||
Whenever you are ready to export your MCU project to the Qt Design Studio: | |||
*make sure you've set the Export target to 'Qt for MCUs' | |||
*go through all groups and layers and specify the expected settings | |||
*evaluate (try to apply or acknowledge) the hints presented in the 'Node Info' section | |||
*click the 'Export' button (Home tab) and save the export file | |||
*review the log generated during the export process | |||
[[File:Qt bridge project and export button.png|thumb|none|813x813px]] | |||
[[File:Qt bridge export console with save file.png|thumb|none|637x637px]] | |||
===Importing project into Qt Design Studio=== | |||
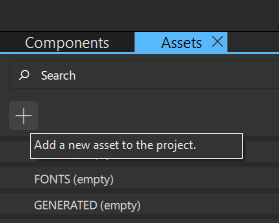
[https://doc.qt.io/qtdesignstudio/studio-projects-for-mcus.html#creating-an-mcu-project Create a new project for MCUs] and import .qtbridge file prepared in a previous step. Click on the + in the Assets section or drag and drop the file into the Qt Design Studio window. | |||
[[File:Ds import assets.png|thumb|none]] | |||
'''Note:''' If you don't see the Assets section, you can enable it in View -> Views -> Assets. | |||
Detailed instructions on how to import assets can be found [https://doc.qt.io/qtdesignstudio/studio-importing-2d.html here]. | |||
[[File:Ds import console.png|thumb|none|572x572px]] | |||
Watch the import console to see if any warnings or errors occur during the import process. Some problems can be fixed automatically (such as non-unique IDs), but if you encounter errors, it's recommended that you fix them in the source project. | |||
[[File:Ds import assets error.png|thumb|none|384x384px]] | |||
If all goes well, you should be able to see your assets, automatically generated QML components, and preview them. | |||
[[File:Ds qml runtime with designer and code.png|thumb|none|998x998px]] | |||
== Project organization in Figma == | |||
To achieve the best results and avoid unexpected problems during the export-import process, follow the [https://doc.qt.io/qtdesignstudio/qtbridge-figma-using.html#organizing-designs Organizing Designs guidelines] when developing a project in Figma. | |||
== Setting up the Qt for MCUs SDK in Qt Design Studio == | |||
The key concept behind the Qt Design Studio is to bridge the gap between designers and developers. The built-in code editor allows you to customize your project in any way you like. Due to MCU platform limitations, you may find yourself in a situation where the QML code preview in the Qt Design Studio works perfectly, but the code is not compatible with MCU platforms. To avoid this, you can optionally configure the Qt for MCUs SDK in the Qt Design Studio to trigger the [https://doc.qt.io/QtForMCUs-2.8/qtul-qmlproject-qmlprojectexporter.html qmlprojectexporter] for the desktop platform on each run, ensuring that the QML code is compatible with Qt Quick Ultralite. | |||
'''Note:''' Qt for MCUs is available under certain [https://www.qt.io/qt-licensing licenses]. | |||
Install Qt for MCUs using the Qt Online Installer, which you can find on your [https://account.qt.io/s/downloads Qt account] page. | |||
[[File:Ds install qt for mcus.png|thumb|none|602x602px]] | |||
'''Note:''' we recommend using the latest available version of Qt Design Studio and Qt for MCUs. If that's not an option, see versions [https://doc.qt.io/qtdesignstudio/studio-compatibility-with-mcu-sdks.html compatibility matrix]. | |||
In the Qt Design Studio, go to the Edit -> Preferences -> Devices -> MCU and set the path to the recently downloaded SDK. | |||
[[File:Ds mcu sdk setup.png|thumb|none|607x607px]] | |||
Save the settings and restart Qt Design Studio. The next time you run the MCU project, check the Compile Output console (Alt + 4), qmlprojectexporter will ensure that the QML code is valid for MCUs. | |||
[[File:Ds qmlprojectexporter error.png|thumb|none|607x607px]] | |||
For more information on developing applications for MCUs, see [https://doc.qt.io/qtdesignstudio/studio-developing-apps-for-mcus.html Developing Applications for MCUs]. | |||
==Example projects== | |||
You may notice that some features in the Qt Design Studio interface are grayed out (disabled). This is due to the limitations of the MCU-specific projects, which are described in ''Projects for MCUs''. To check which features are available for MCUs, see [https://doc.qt.io/qtdesignstudio/studio-features-on-mcu-projects.html Qt Design Studio Features for MCU Projects]. | |||
If you want to get some practice with MCU projects and Qt Design Studio, check out the following MCU-specific sample projects: | |||
*Washing Machine | |||
*Thermostat Demo | |||
You can find them on the Welcome page, in the [https://doc.qt.io/qtdesignstudio/studioexamples.html Examples] section. | |||
==Known issues or limitations== | |||
These are the most common limitations you need to be aware of when working on MCU projects in Figma with the intention of later exporting them to Qt Design Studio: | |||
* rotation is only allowed on texts or rasterized nodes | |||
* stroke properties are not supported | |||
* layers with effects can either be rasterized and exported as image assets, or effects can be skipped (cannot use [https://www.youtube.com/watch?v=h0p27_HScxc Design Effects]) | |||
* only linear gradients are supported | |||
* shapes cannot be exported as [https://doc.qt.io/qtquickstudiocomponents/qml-qtquick-studio-components-svgpathitem.html SvgPathItem] components | |||
A summary of known issues or limitations in the Qt for MCUs can be found at [https://doc.qt.io/QtForMCUs-2.8/qtul-known-issues.html Known Issues or Limitations]. | |||
The public bug tracker is a place where all user-reported issues can be tracked: [https://bugreports.qt.io/projects/QTMCU/issues/QTMCU-345?filter=allopenissues Qt for MCUs], [https://bugreports.qt.io/browse/QDS-14092?jql=project%20%3D%20%22Qt%20Design%20Studio%22%20 Qt Design Studio], and [https://bugreports.qt.io/browse/QDS-14090?jql=project%20%3D%20QDS%20AND%20component%20%3D%20Qt-Bridge-Figma Qt Bridge for Figma]. | |||
If you have a problem that is not listed above, you can [https://wiki.qt.io/Reporting_Bugs create a new ticket]. | |||
==More info== | |||
If you want to learn more, a good place to start is the Qt Academy with the following courses: | |||
* [https://www.qt.io/academy/course-catalog#getting-started-with-qt-design-studio Getting Started with Qt Design Studio] | |||
* [https://www.qt.io/academy/course-catalog#getting-started:-qt-for-mcus Getting Started: Qt for MCUs] | |||
* [https://www.qt.io/academy/course-catalog#how-to-use-qt-bridge-for-figma How to Use Qt Bridge for Figma] | |||
Also check out our docs, wiki page, and tutorials posted on Youtube: | |||
* [https://wiki.qt.io/QtDesignStudio/MCU_FAQ MCU FAQ] | |||
* [https://doc.qt.io/qtdesignstudio/qtbridge-figma-using.html Using Qt Bridge for Figma] | |||
* [https://doc.qt.io/qtdesignstudio/qtbridge-figma-template.html Using Figma Quick Control Template Components in Qt Design Studio] | |||
* [https://doc.qt.io/qtdesignstudio/studio-features-on-mcu-projects.html Qt Design Studio Features on MCU Projects] | |||
* [https://doc.qt.io/qtdesignstudio/studio-on-mcus.html Qt Design Studio on MCUs] | |||
* [https://www.youtube.com/watch?v=jxmZxZSBj0Y Using Figma Bridge Video Tutorial] | |||
* [https://wiki.qt.io/QtDesignStudio/FigmaPlugin Qt Bridge for Figma Wiki] | |||
* [https://doc.qt.io/qtdesignstudio/studio-compatibility-with-mcu-sdks.html Qt Design Studio Version Compatibility with Qt for MCUs SDKs] | |||
* [https://www.figma.com/@qtdesignstudio Figma projects] | |||
Latest revision as of 06:44, 19 September 2025
This was moved to: QtDesignStudio/Getting Started with Qt Bridge for Figma
The following guide is an introduction to the Qt Design Studio and it's integration with Figma through the Qt Bridge. The focus is on Qt for MCU project development. If you are new to the Qt Design Studio, please visit the Qt Design Studio Documentation for detailed installation instructions, getting started guide and tutorials.
Qt Bridge for Figma
Qt Bridge for Figma is a plugin that allows you to export projects from Figma and ultimately convert them into executable QML code in Qt Design Studio. The plugin has a number of settings that allow you to customize the export process or inject QML code into QML components. It also has a special Qt for MCUs mode that respects MCU limitations and provides useful hints during design creation.
If you are interested in the technical details of the Qt Design Studio and Figma integration, read the Qt-Bridge Metadata format article and watch the Qt Bridge Plugins in Depth video.
Getting Qt Bridge for Figma
Note: Qt Bridge for Figma is available under the Qt Design Studio Enterprise license
- Go to the plugin page
- Click on 'Open in Figma' (it may ask you to to log in to your Figma account)
- Open in... -> Playground file (or one any of your recent projects)
- Plugin is now available via main menu or over actions (Ctrl + K)
Advise for designing in Figma
When designing in Figma for exporting directly to QML for Qt4Mcu you have to keep the structure minimal and avoid unnecessary items because they come with a cost of memory and performance. Do not use variants to define screens that look really different. Use components instead and only change the visibility if you want to use variants. Also the number of states should not be excessive, because a large number of states (usually over 10) can impact performance and maintainability.
Remember that merging layers will raster items into images during export, and memory consumption can be huge.
Using opacity and scaling usually has a severe performance impact on MCU hardware
Projects for MCUs
MCU platforms have limited resource availability, so getting the most out of them is critical. To achieve the best results, we have introduced Qt Quick Ultralite, which is specifically designed for embedded platforms. However, there are differences between the regular Qt library and Qt Quick Ultralite (you can read more about them here). When working on a project for MCUs, you need to be aware of these limitations. To help you best prepare your project before exporting to Qt Design Studio, we have added a special mode to Qt Bridge for the Figma plugin.
Note: To learn more about limitations, see Known issues or limitations section.
Export target: Qt for MCUs
The MCU mode in the Qt Bridge for Figma has two main purposes:
- preset plugin settings so that customization of the export process is compatible with the Qt Quick Ultralite
- enable MCU-specific checks, that provide a valuable information when using properties or effects that can't be reflected in the Qt Quick Ultralite

If you want to see Qt for MCUs warnings:
- Go to the Settings
- Set the Export target to 'Qt for MCUs'
- Select an item in Figma, that you want to verify
- Check Home -> Node Info
Note: Node Info can also display non-MCU related information, such as rasterization tips. These are also available in a regular mode (Export target: Qt)
Export Settings
Qt Bridge for Figma has a number of settings that allow end users to control the export process and customize the QML code generated in Qt Design Studio. You can find out how to use the available options by:
- visiting the Export Settings documentation page
- exploring the Figma project: Qt Bridge for Figma Tutorial
- visiting the FAQ page: What's the difference between Home and Settings tabs in the Qt Bridge for Figma?
- checking the built-in documentation - just hover the mouse pointer over the setting you are interested in and wait for the tooltip
Sometimes a particular setting may be disabled (grayed out). This means that you cannot use it in a certain context. For example: the 'Start screen' option can only be applied to the top level components or frames, 'Export As' may be disabled for instances of the components, Design Effects cannot be applied in the MCU context etc. To learn more about limitations, see the Known issues or limitations section.
Workflow
The workflow is quite simple, there are two main steps between the Figma project and the running QML-based application:
- Prepare and export project metadata using Qt Bridge for Figma
- Import the metadata archive into a project created in the Qt Design Studio
Exporting project from Figma
Whenever you are ready to export your MCU project to the Qt Design Studio:
- make sure you've set the Export target to 'Qt for MCUs'
- go through all groups and layers and specify the expected settings
- evaluate (try to apply or acknowledge) the hints presented in the 'Node Info' section
- click the 'Export' button (Home tab) and save the export file
- review the log generated during the export process


Importing project into Qt Design Studio
Create a new project for MCUs and import .qtbridge file prepared in a previous step. Click on the + in the Assets section or drag and drop the file into the Qt Design Studio window.
Note: If you don't see the Assets section, you can enable it in View -> Views -> Assets.
Detailed instructions on how to import assets can be found here.

Watch the import console to see if any warnings or errors occur during the import process. Some problems can be fixed automatically (such as non-unique IDs), but if you encounter errors, it's recommended that you fix them in the source project.

If all goes well, you should be able to see your assets, automatically generated QML components, and preview them.

Project organization in Figma
To achieve the best results and avoid unexpected problems during the export-import process, follow the Organizing Designs guidelines when developing a project in Figma.
Setting up the Qt for MCUs SDK in Qt Design Studio
The key concept behind the Qt Design Studio is to bridge the gap between designers and developers. The built-in code editor allows you to customize your project in any way you like. Due to MCU platform limitations, you may find yourself in a situation where the QML code preview in the Qt Design Studio works perfectly, but the code is not compatible with MCU platforms. To avoid this, you can optionally configure the Qt for MCUs SDK in the Qt Design Studio to trigger the qmlprojectexporter for the desktop platform on each run, ensuring that the QML code is compatible with Qt Quick Ultralite.
Note: Qt for MCUs is available under certain licenses. Install Qt for MCUs using the Qt Online Installer, which you can find on your Qt account page.

Note: we recommend using the latest available version of Qt Design Studio and Qt for MCUs. If that's not an option, see versions compatibility matrix.
In the Qt Design Studio, go to the Edit -> Preferences -> Devices -> MCU and set the path to the recently downloaded SDK.
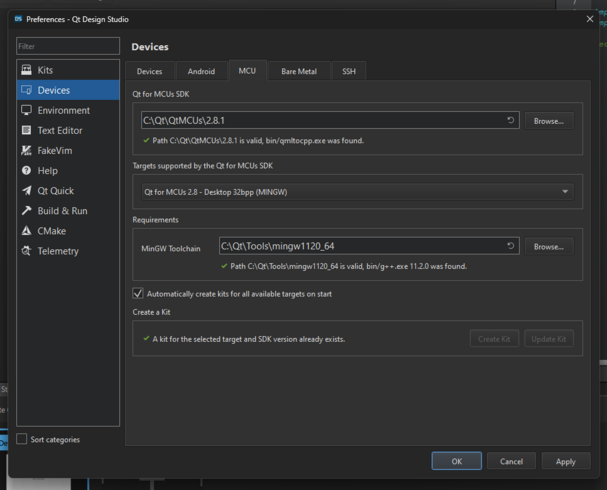
Save the settings and restart Qt Design Studio. The next time you run the MCU project, check the Compile Output console (Alt + 4), qmlprojectexporter will ensure that the QML code is valid for MCUs.
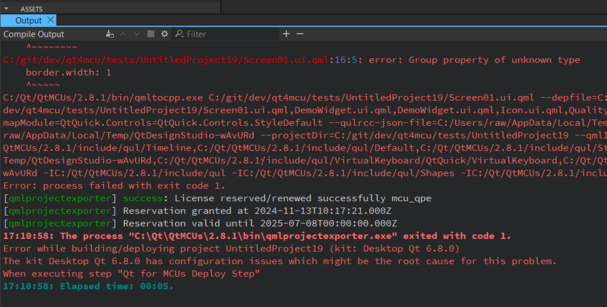
For more information on developing applications for MCUs, see Developing Applications for MCUs.
Example projects
You may notice that some features in the Qt Design Studio interface are grayed out (disabled). This is due to the limitations of the MCU-specific projects, which are described in Projects for MCUs. To check which features are available for MCUs, see Qt Design Studio Features for MCU Projects. If you want to get some practice with MCU projects and Qt Design Studio, check out the following MCU-specific sample projects:
- Washing Machine
- Thermostat Demo
You can find them on the Welcome page, in the Examples section.
Known issues or limitations
These are the most common limitations you need to be aware of when working on MCU projects in Figma with the intention of later exporting them to Qt Design Studio:
- rotation is only allowed on texts or rasterized nodes
- stroke properties are not supported
- layers with effects can either be rasterized and exported as image assets, or effects can be skipped (cannot use Design Effects)
- only linear gradients are supported
- shapes cannot be exported as SvgPathItem components
A summary of known issues or limitations in the Qt for MCUs can be found at Known Issues or Limitations.
The public bug tracker is a place where all user-reported issues can be tracked: Qt for MCUs, Qt Design Studio, and Qt Bridge for Figma.
If you have a problem that is not listed above, you can create a new ticket.
More info
If you want to learn more, a good place to start is the Qt Academy with the following courses:
Also check out our docs, wiki page, and tutorials posted on Youtube:
- MCU FAQ
- Using Qt Bridge for Figma
- Using Figma Quick Control Template Components in Qt Design Studio
- Qt Design Studio Features on MCU Projects
- Qt Design Studio on MCUs
- Using Figma Bridge Video Tutorial
- Qt Bridge for Figma Wiki
- Qt Design Studio Version Compatibility with Qt for MCUs SDKs
- Figma projects