Qt for OpenHarmony: Difference between revisions
update the format |
|||
| Line 179: | Line 179: | ||
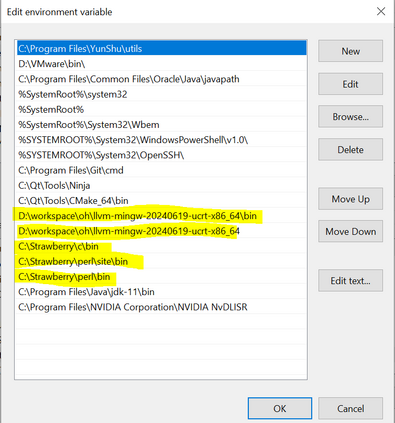
* Add MinGW and Perl paths to PATH environment variable as shown below: | * Add MinGW and Perl paths to PATH environment variable as shown below: | ||
<blockquote>[[File:Add environment variable.png|frameless|423x423px]]</blockquote> | <blockquote>[[File:Add environment variable.png|frameless|423x423px]]</blockquote> | ||
* Open command prompt (cmd.exe was used) and set following environment variables: | * Open command prompt (cmd.exe was used) and set following environment variables: | ||
Revision as of 06:50, 12 September 2024
OpenHarmony Introduction
OpenHarmony is an open-source project incubated and operated by the OpenAtom Foundation, with the goal of building a framework and platform for intelligent terminal device operating systems. It aims to cater to the era of full-scenario, full-connectivity, and full-intelligence, and promote the prosperous development of the Internet of Everything industry.
OpenHarmony Open source project
HUAWEI DevEco Studio Installation
If you want to develop Qt for OpenHarmony applications, apart from using Qt Creator, you also need to rely on DevEco Studio.
https://developer.huawei.com/consumer/cn/deveco-studio/
In general, there is no need to configure the sdk version used by DevEco Studio because DevEco Studio comes with one sdk by default.
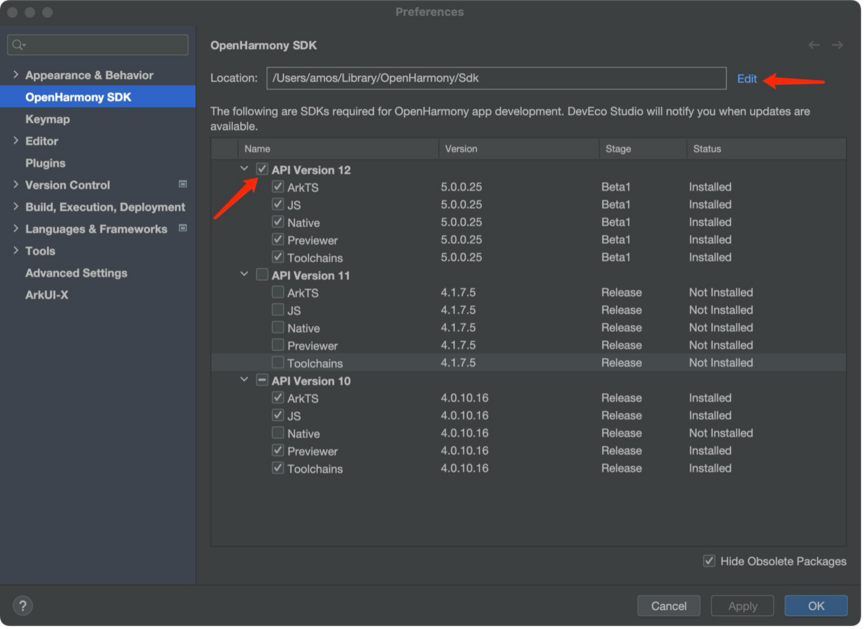
However, if the included sdk does not meet your needs, you can set the sdk version you want to use by using the following method:
For OpenHarmony 5, you want to install API Version 12 SDK:
To avoid any issues caused by the development environment, please first confirm if you can use DevEco Studio to develop Arkts applications.
Gerrit Introduction
The Qt source code is hosted on Gerrit for code review and version control. All needed information about how to work with Gerrit is written on the following pages:
How to get Qt for OpenHarmony source code
- Access and login to: https://codereview.qt-project.org.
- Click on the "Settings" in the upper right corner to open the settings page.
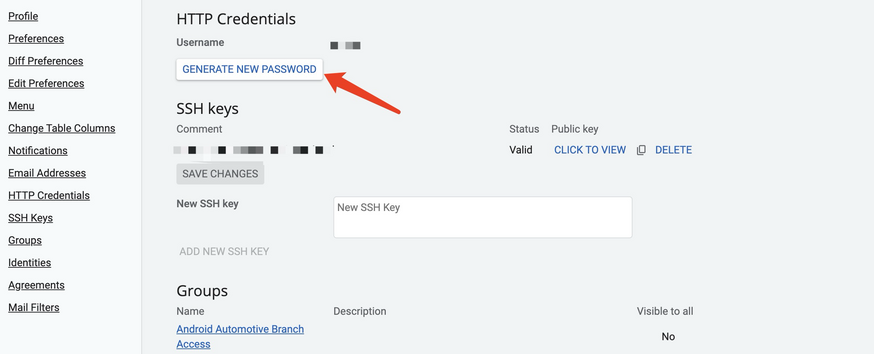
- Click on "Settings" -> "HTTP Credentials" -> "GENERATE NEW PASSWORD" to generate a new password. Save the password for later use with "git clone".
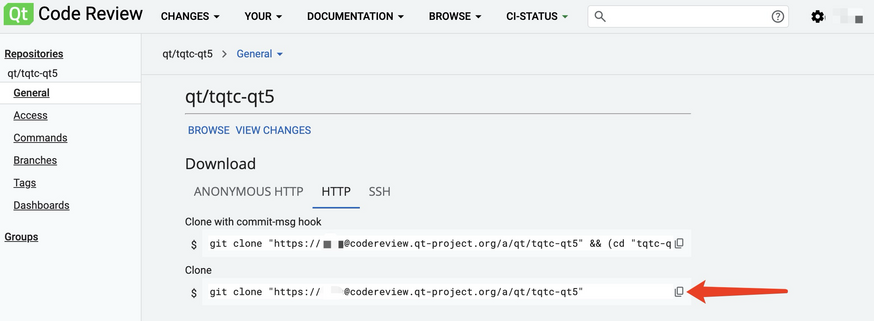
- Access https://codereview.qt-project.org/admin/repos/qt/tqtc-qt5, and copy the git repository address.

Building Qt Library for Qt for OpenHarmony in macOS
Prepare for third-party dependencies
Following instruction has been prepared based on macOS Sonoma 14.0. Does not represent a minimum dependency condition.
- git version 2.39.3
- python 3.12.0
System environments
Open ~/.zshrc or ~/.bashrc and add the following:
local HARMONY_OS_API_VER=12
local HOME_LIBRARY=${HOME}/Library
export OHOS_SDK_ROOT=${HOME_LIBRARY}/OpenHarmony/Sdk
export HOS_SDK_HOME=${HOME_LIBRARY}/OpenHarmony/Sdk
export OHOS_SDK_12=${HOS_SDK_HOME}/${HARMONY_OS_API_VER}
export NATIVE_OHOS_SDK=${OHOS_SDK_12}/native
Building Qt sources
You can use below script to build Qt for arm64-v8a target.
Please fill-in path to your local source directory.
#!/bin/sh

# Target architecure
ARCH="arm64-v8a"

# Source and build directories
QT5_ROOT_DIR=<ENTER PATH TO YOUR qt/qt5 DIRECORY>
QT5_BUILD_DIR="$QT5_ROOT_DIR/build_${ARCH}"

# Prepare build directory
mkdir "$QT5_BUILD_DIR"
cd "$QT5_BUILD_DIR"

../configure \
    -v \
    -xplatform ohos-clang \
    -prefix ${NATIVE_OHOS_SDK}/opt/Qt/5.12.12/ohos-${ARCH}-clang/ \
    -opensource \
    -confirm-license \
    -release \
    -no-use-gold-linker \
    -no-gcc-sysroot \
    -ohos-arch ${ARCH} \
    -opengles3 \
    -skip qt3d -skip qtactiveqt -skip qtandroidextras -skip qtcanvas3d -skip qtcharts \
    -skip qtconnectivity -skip qtdatavis3d -skip qtdoc -skip qtdocgallery -skip qtfeedback \
    -skip qtgamepad -skip qtgraphicaleffects -skip qtlocation -skip qtmacextras -skip qtnetworkauth \
    -skip qtpim -skip qtpurchasing -skip qtqa -skip qtremoteobjects -skip qtrepotools \
    -skip qtscript -skip qtscxml -skip qtsensors -skip qtserialbus -skip qtserialport \
    -skip qtspeech -skip qtsystems -skip qttools -skip qttranslations -skip qtvirtualkeyboard \
    -skip qtwayland -skip qtwebchannel -skip qtwebengine -skip qtwebglplugin -skip qtwebsockets \
    -skip qtwebview -skip qtwinextras -skip qtx11extras -skip qtxmlpatterns -skip doc \
    -no-dbus \
    -c++std c++14 \
    -make tests
then,
make -j16
make install
Building Qt Application for OpenHarmony in macOS
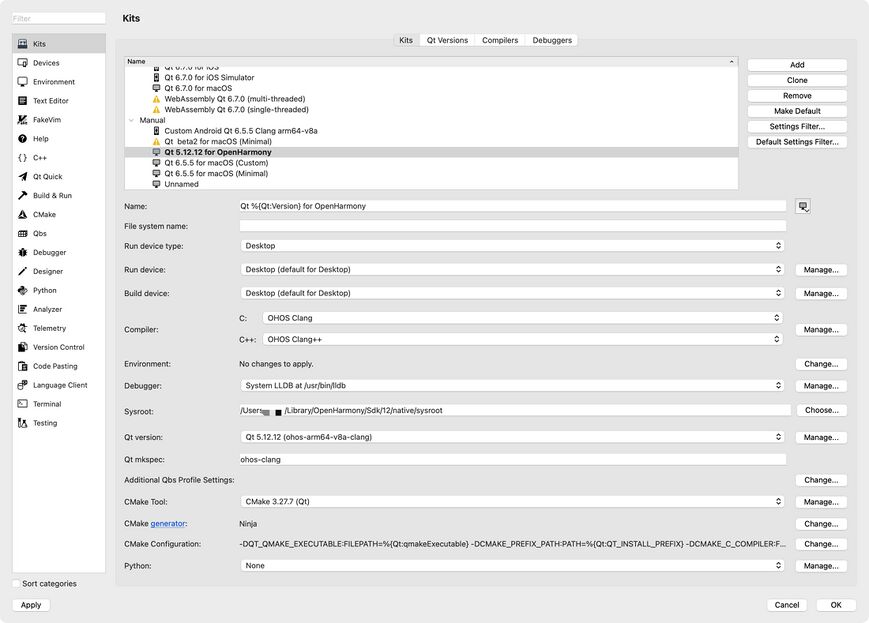
Creating development kit for OpenHarmony in Qt Creator
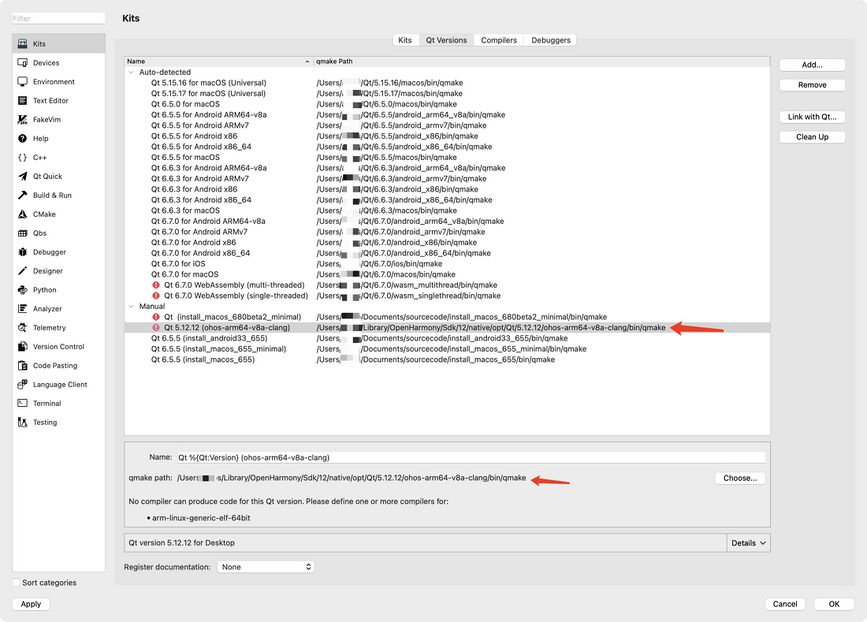
Go to Preferences → Kits → Qt Versions. Click the button Add….
Configuring Qt Version
Select the qmake file generated by compiling the Qt for OpenHarmony source code:
Configuring Compilers
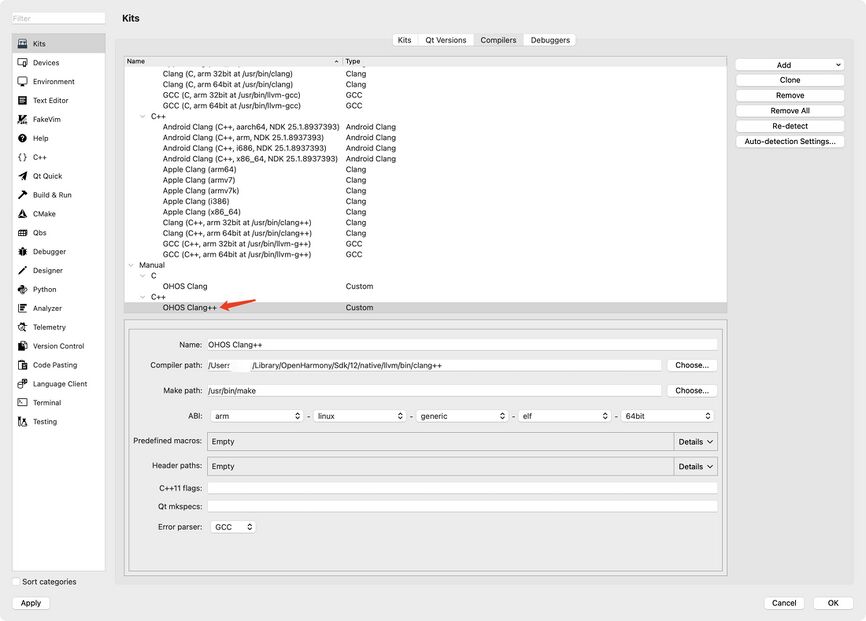
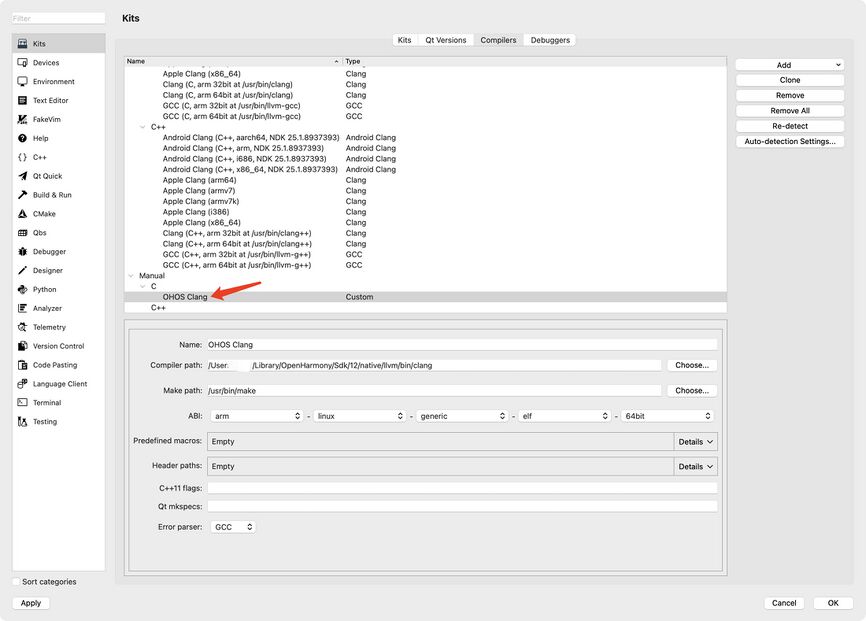
Go to the Compilers tab. Click on the button Add, then select Custom → C.
Set:
Name: OHOS Clang
Compiler path: /path/to/OpenHarmony/Sdk/12/native/llvm/bin/clang
Make Path: /usr/bin/make
ABI: arm - linux - generic - elf - 64bit
Follow the above steps for the C++ compiler. However, this time, make sure to set Name to OHOS Clang++ and in Compiler path select the
clang++ instead.
Configuring Kits
Go to Kits tab.
Click the Add button.
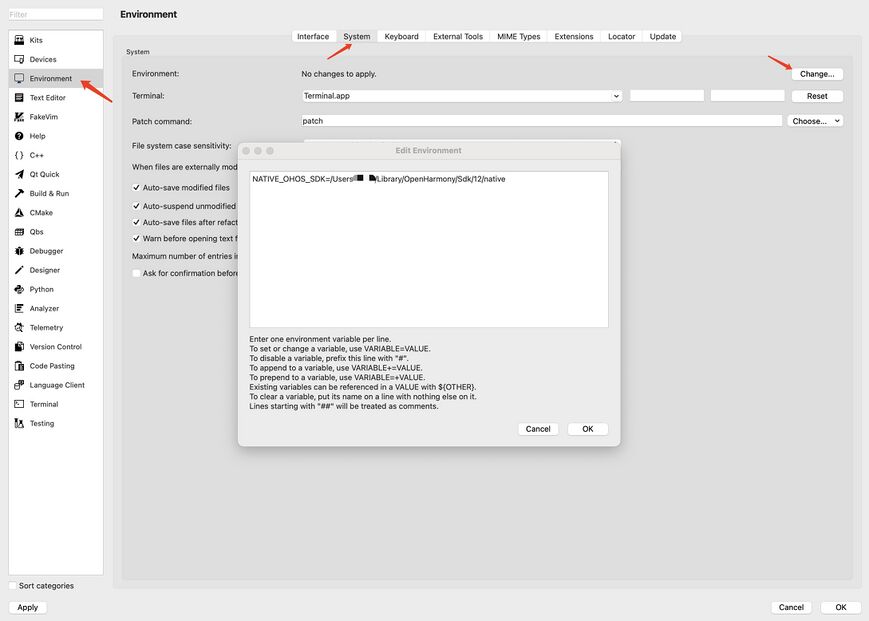
Setting required environment variables in Qt Creator
Go Preferences → Environment → System and click the Change… button in Environment section.
Add a new environment variable by adding a line:
NATIVE_OHOS_SDK=/path/to/OpenHarmony/Sdk/12/native
Building Qt Library for OpenHarmony in Windows
Preparing the Build Environment
- Clone qt5 repository from Gerrit using --recursive parameter to get also all submodules,Qt for OpenHarmony#How to get Qt for OpenHarmony source code:
- Install DevEco Studio and download the OpenHarmony/native package from its SDK manager,Qt for OpenHarmony#HUAWEI DevEco Studio Installation.
- Download MinGW toolchain
For example llvm-mingw-20230919-ucrt-x86_64.zip from Releases · mstorsjo/llvm-mingw Unzip and copy folder for example to d:\
- Install Perl
- Add MinGW and Perl paths to PATH environment variable as shown below:
- Open command prompt (cmd.exe was used) and set following environment variables:
REM set NATIVE_OHOS_SDK
SET NATIVE_OHOS_SDK=D:\oh\DevEcoStudio\sdk\HarmonyOS-NEXT-DB6\openharmony\native

REM set OHOS_SDK_SYSROOT
SET OHOS_SDK_SYSROOT=%NATIVE_OHOS_SDK%\sysroot

REM set LLVM_INSTALL_DIR
SET LLVM_INSTALL_DIR=%NATIVE_OHOS_SDK%\llvm
Building
- With the same command prompt locate to your qt5 repository directory and create build directory parallel to that (Do NOT make the build
directory a subdirectory of the qt5 directory). Then Go to build directory, define a variable with skipped modules and run configure
command:
REM set QT_SKIPS
SET QT_SKIPS=-skip qt3d -skip qtactiveqt -skip qtandroidextras -skip qtcanvas3d -skip qtcharts -skip qtconnectivity -skip qtdatavis3d -skip qtdoc -skip qtdocgallery -skip qtfeedback -skip qtgamepad -skip qtgraphicaleffects -skip qtlocation -skip qtmacextras -skip qtnetworkauth -skip qtpim -skip qtpurchasing -skip qtqa -skip qtremoteobjects -skip qtrepotools -skip qtscript -skip qtscxml -skip qtsensors -skip qtserialbus -skip qtserialport -skip qtspeech -skip qtsystems -skip qttools -skip qttranslations -skip qtvirtualkeyboard -skip qtwayland -skip qtwebchannel -skip qtwebengine -skip qtwebglplugin -skip qtwebsockets -skip qtwebview -skip qtwinextras -skip qtx11extras -skip qtxmlpatterns -no-dbus -skip doc
REM configure command call ..\tqtc-qt5\configure.bat -v -xplatform ohos-clang -device-option CROSS_COMPILE=%LLVM_INSTALL_DIR%\bin -prefix c:\Qt\qt-5.12.12-ohos -opensource -confirm-license -debug -no-use-gold-linker %QT_SKIPS% -nomake tests -nomake examples -no-gcc-sysroot -opengles3 -c++std c++14 -ohos-arch arm64-v8a
- After configure is finished successfully you can start building with mingw32-make:
REM build mingw32-make
mingw32-make -j8
- After successful build you can start installing with following command:
mingw32-make install
Building Qt Application for OpenHarmony in Windows
The following parts of the instruction, that you have installed DevEco studio, OpenHarmony toolchains,already have the device of Huawei PC or Pad. Huawei MatePad Pro tablet architecture is
arm64-v8a, so be aware that Qt5 build + multiple options.
Preparing Qt Creator as a Qt IDE
Download Qt Creator,create a kit for OpenHarmony manually
Creating development kit for OpenHarmony in Qt Creator
Go to Edit →Preferences→Kits
Configuring Qt Version
Go to Qt Version tab. Click the button Add…
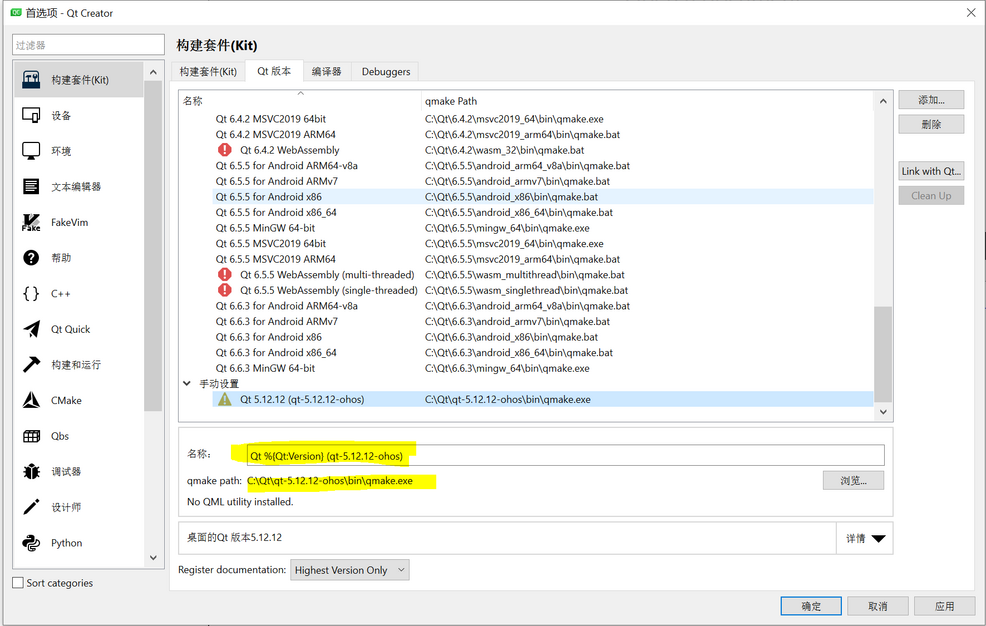
Go to the folder in which Qt 5.12.12 for OHOS was installed (it should be installed in a path specified with PREFIX), then go to the bin folder, and select the qmake application and click Open. For example, I compiled the Qt source code with PREFIX=C:\Qt\qt-5.12.12-ohos, so qmake will be in C:\Qt\qt-5.12.12-ohos\bin\qmake. Set Name to Qt %{Qt:Version} for OHOS. At this point, there should be information, that there are no compilers that can produce code for this Qt version.
Configuring Compilers
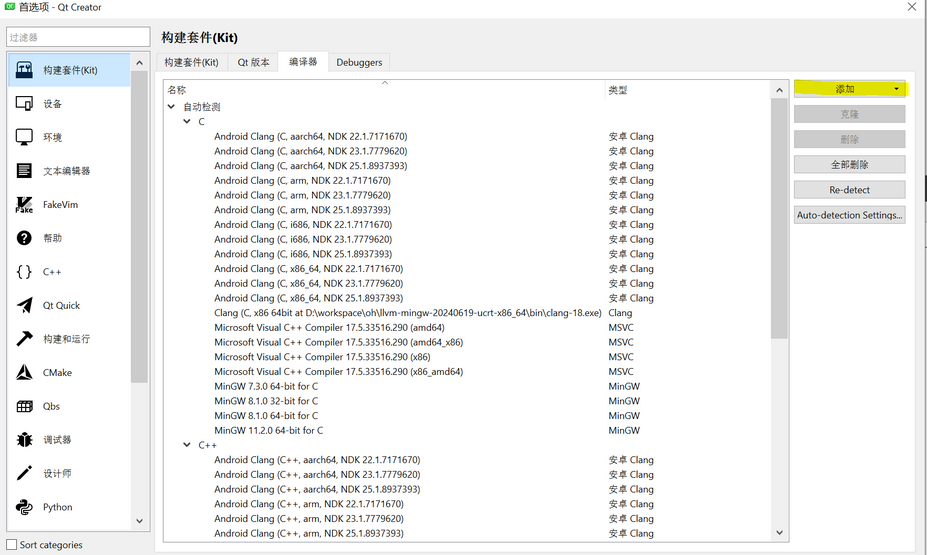
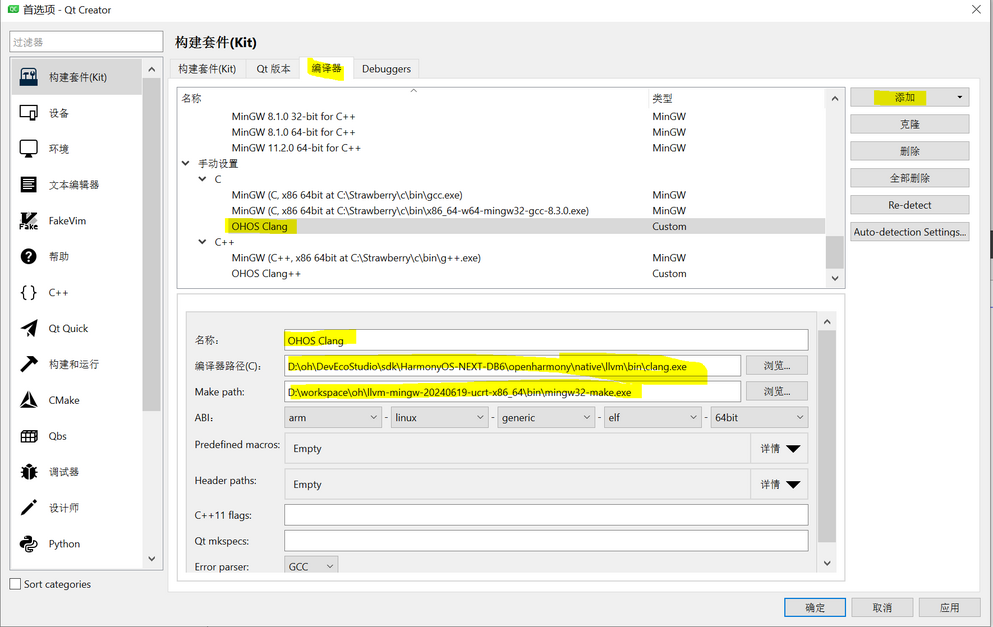
Go to the Compilers tab. Click on the button Add, then select Custom→C
Set Name to OHOS Clang.
Assuming you have followed the instruction to build Qt 5.12.12 for OHOS from sources, you should have llvm-mingw already installed. If not, please follow the MinGW toolchain installation stepQt for OpenHarmony#Preparing the Build Environment
Set the Make path to mingw32-make.exe executable shipped with your MinGW toolchain. It should be located in <path-to-MinGW-toolchain>\bin\mingw32-make.exe. Do not forget to substitute <path-to-MinGW-toolchain>with the actual path.
Change the ABI to arm - linux - generic - elf - 64bit
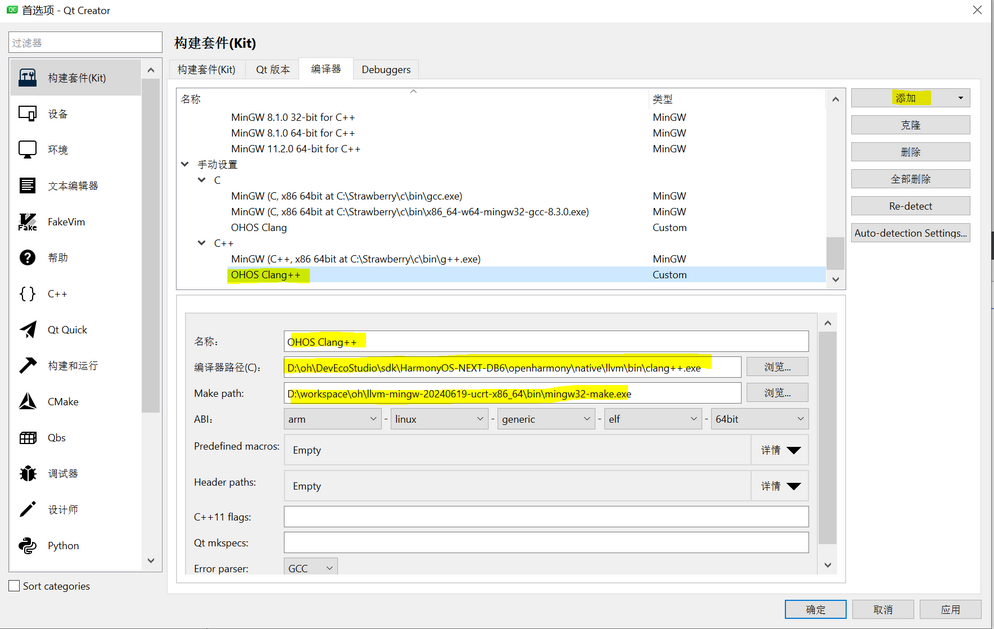
Follow the above steps for the c++ compiler. However, this time, make sure to set Name to OHOS Clang++ and in Compiler path select the clang++.exe instead.
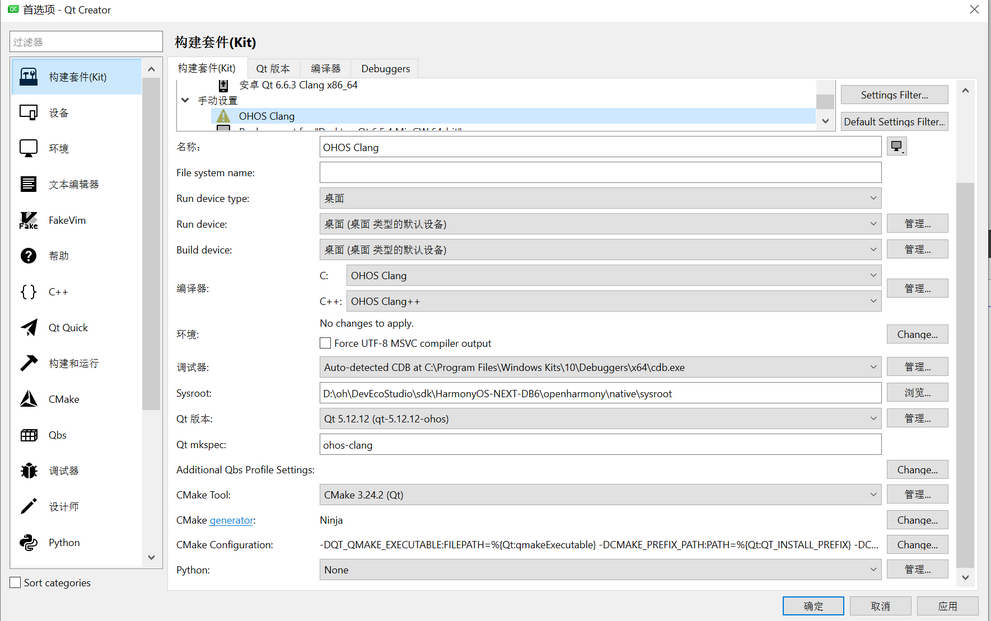
Configuring Kits
Go to Qt kits tab. Click the button Add…
Set Name to OHOS Clang
Set Sysroot to D:\oh\DevEcoStudio\sdk\HarmonyOS-NEXT-DB6\openharmony\native\sysroot. In Compiler section, select previously configured compilers for C(OHOS Clang) and C++(OHOS Clang++).
In Qt version select previously configured Qt 5.12.12 for OHOS.
Set Qt mkspec to ohos-clang.
The complete Kit should look like this:
Setting required environment variables in Qt Creator
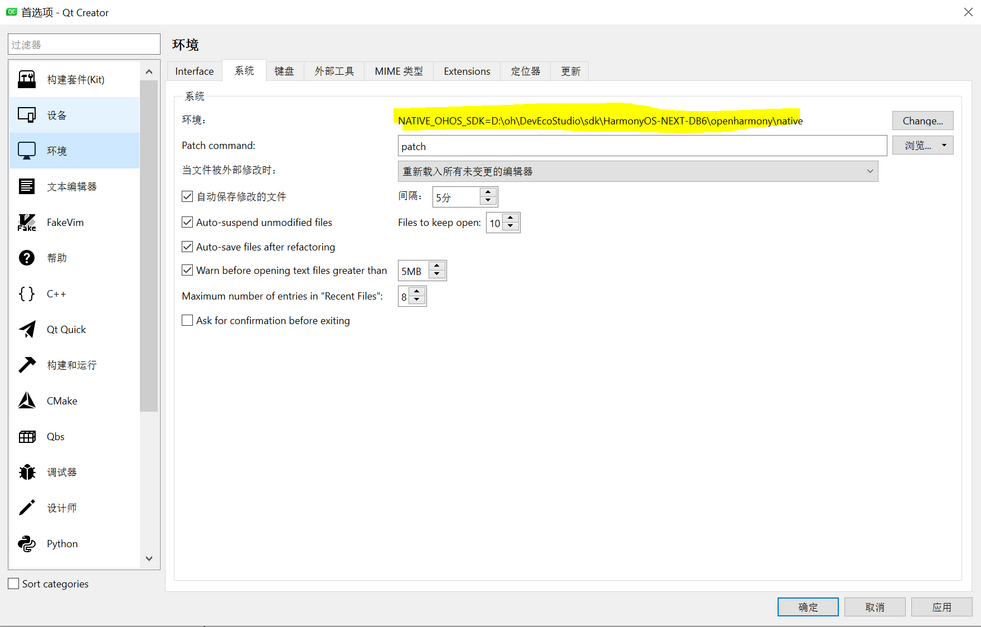
Go to Edit→Preferences→Environment→System and click the Change…button in Environment section.
Add a new environment variable by adding a line NATIVE_OHOS_SDK=D:\oh\DevEcoStudio\sdk\HarmonyOS-NEXT-DB6\openharmony\native
Obtaining a template DevEco project
Obtain a template DevEco project for building final OpenHarmony Qt applications. This will be used to run the Qt application on the OpenHarmony device.
Clone the repository https://gitlab.siilicloud.com/automotive/customers/qt/qt-for-openharmony/deveco-studio-projects/ohostemplateforqtapplication into a known location. Let’s call it <deveco-project>
Go to folder<deveco-project>\entry and create a folder<deveco-project>\entry\libs\arm64-v8a
Compiling a simple Qt project
To simplify this instruction, we will not create an application from scratch, instead we will use an existing example from widget.
Go to your Documents folder and create a new folder called qt_creator_projects. Then go to<qt5-root>\examples\widgets\widgets folder in explorer and copy the whole calculator folder into the qt_creator_projects folder
Then, in QtCreator, click on File→Open File or Project, then go to the qt_creator_projects\calculator and select the calculator.profile.
In Configure Project tab select the OHOS Clang kit and click the Configure Project button.
Trigger the compilation by clicking on Build→Build Project “calculator”, or use shortcut: Ctrl+B. The project should compile without errors.
You should be able to find the compiled libcalculator.so file inside the Documents\qt_creators_projects\build-calculator-OHOS_Clang-Debug folder.
Run the Qt for OpenHamony application to the hardware
Building the final OHOS application
Copy the libcalculator.so file from the previous step into your<deveco-project>\entry\libs\arm64-v8a folder
Then copy the needed library from <qt-install-path>\lib\ to <deveco-project>\entry\lib\arm64-v8a\
For example, for libQt5Widgets.so library it will be:
Copy-Item "<qt-install-path>\lib\libQt5Widgets.so" -Destination "<deveco-project>\entry\libs\arm64-v8a\"
Similarly, you can find all dependencies of the OHOS qpa plugin, to make sure, you have all necessary libraries.
Modifying the starting point for XComponent
Once all libraries are copied, we can modify the eTS source code,
Open the <deveco-project> in DevEco:
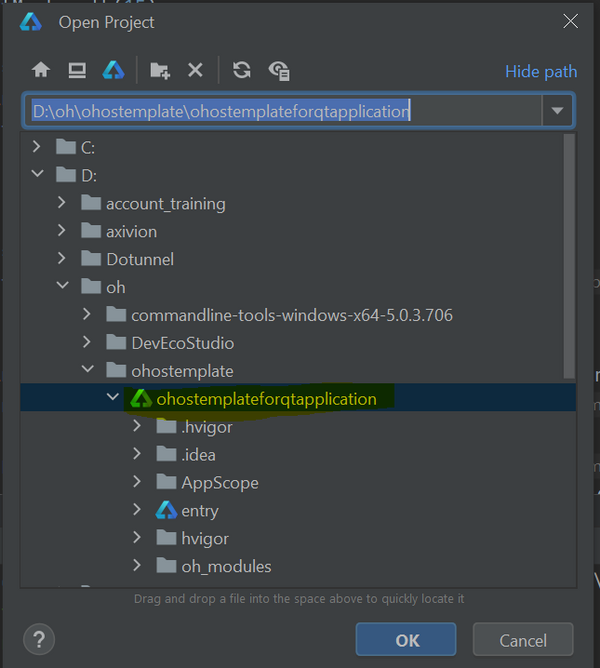
Open file <deveco-project>\entry\src\main\ets\qabilitystage\QAbilitystage.ts. Change the qtApplicationName variable to the name of our library( libcalculator.so ):
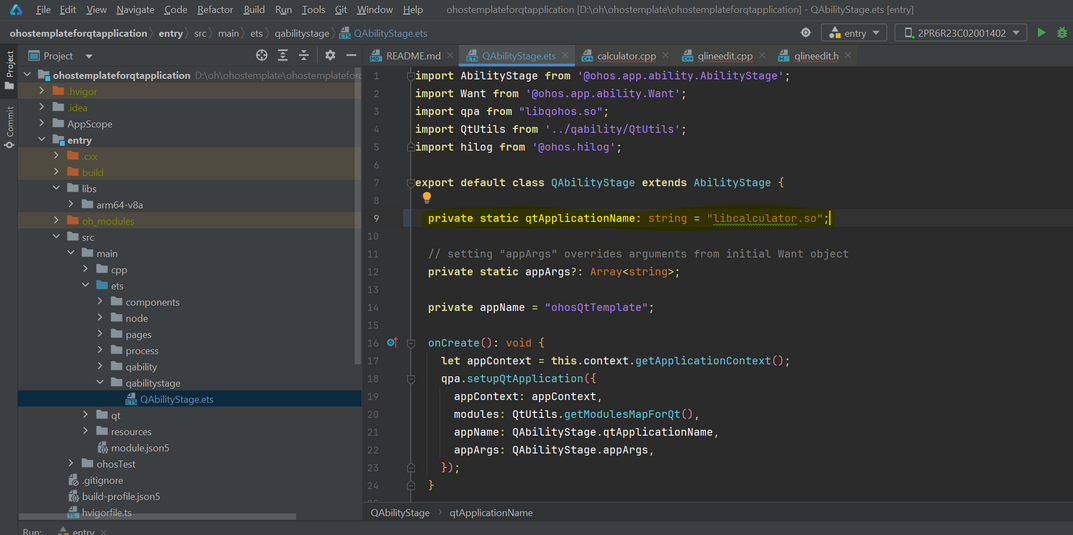
Build and run the application
Make sure the device is connected. Once it is connected, it should be visible in DevEco Studio

Then adding the signing configs,open file--project structure--signing configs,check all the items,and click the OK.
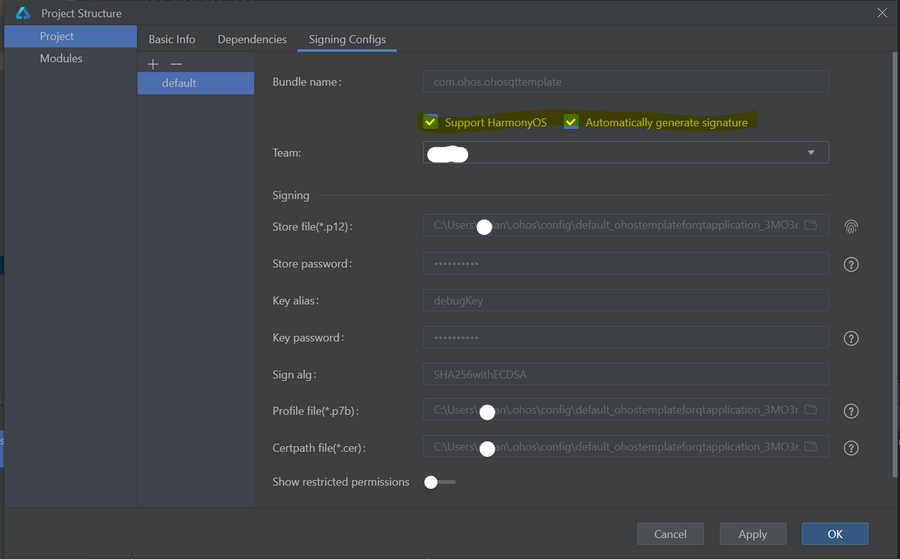
Once the device is selected in DevEco Studio,you can build and run the application directly:
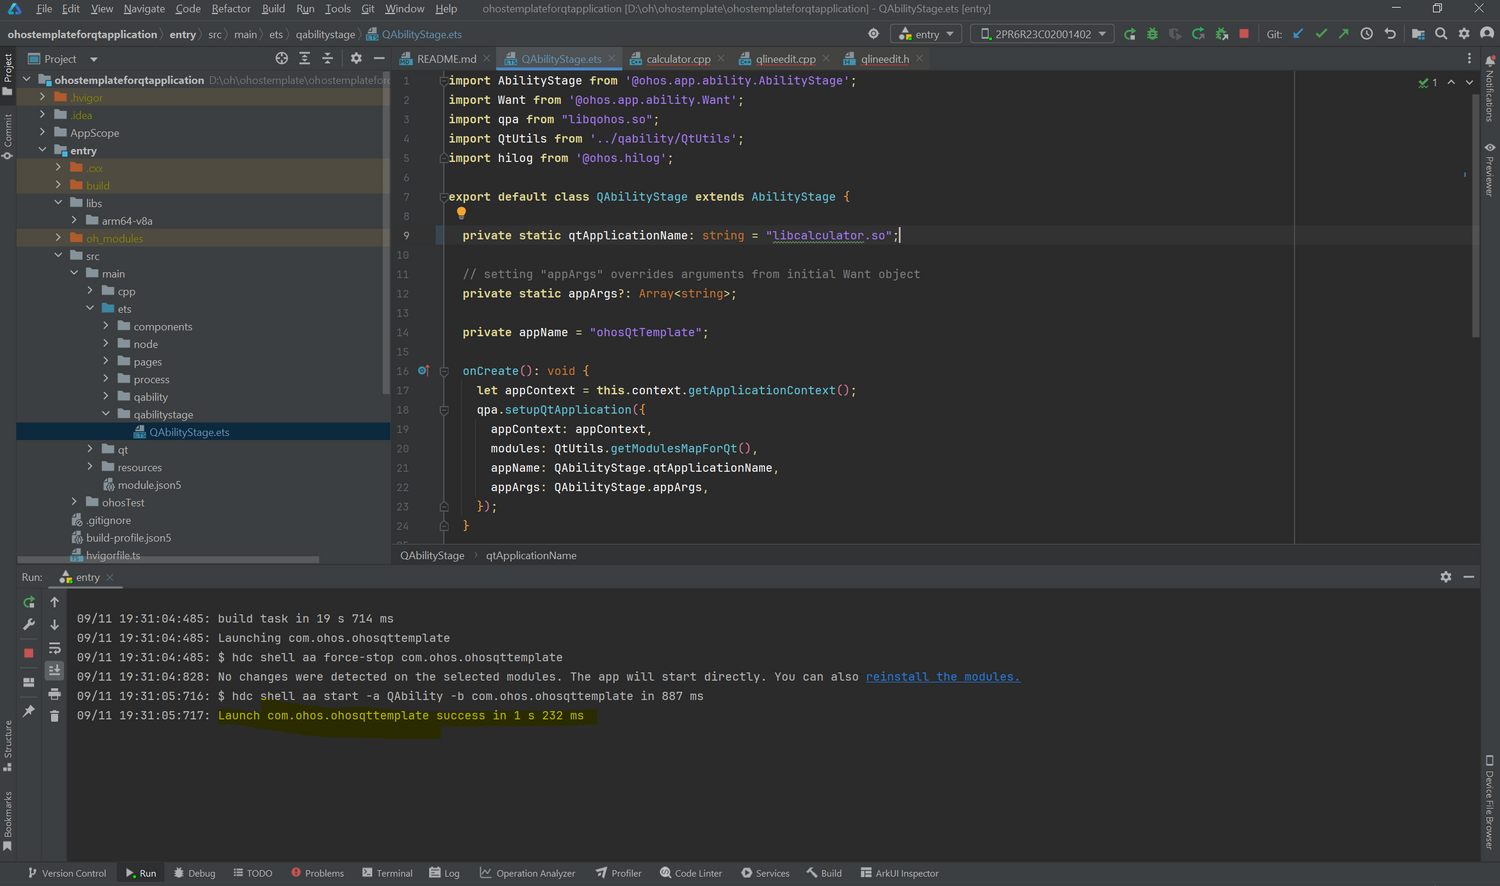
After BUILD SUCCESSFUL, you can see the the application is running on the target device.
