RaspberryPiWithQt5WebEngine
This topic describes how to set up self-compiled Qt WebEngine on Raspberry Pi 3 running Raspbian Stretch with WebGL support using VC4 open source drivers.
If you are interested in an older setup for Raspbian with closed source drivers and the toolchain from Broadcom you can find it here.
Setup
The setup is tested on Rasberry Pi 3 model B. We'll use the latest open source VC4 Gallium3D driver instead of the old closed source binaries from Broadcom. We cannot use the Broadcom toolchain to compile Qt 5.13.2. and Qt WebEngine, because it uses the GCC compiler version 4.8, and we'll need at least version 5.0.
Raspbian Stretch ships with Binutils 2.28, GCC 6.3.0 and GlibC 2.24. Since we would like to use the same GlibC version and try to avoid running into a lot of issues when trying to compiler older GlibC 2.24 with newer GCC, we are going to simply mirror the Raspbian setup and reuse the same versions as Raspbian ships. Therefore we'll start with downloading the sources and Raspbian image.
- Let's create our workspace:
mkdir -p ~/workspaces/raspberrypi-raspbian/image
mkdir -p ~/workspaces/raspberrypi-raspbian/toolchain/sources
mkdir -p ~/workspaces/raspberrypi-raspbian/qt/qt5
- Let's now download archives:
cd ~/workspaces/raspberrypi-raspbian/image
wget https://downloads.raspberrypi.org/raspbian/images/raspbian-2019-04-09/2019-04-08-raspbian-stretch.zip
cd ~/workspaces/raspberrypi-raspbian/toolchain/sources
wget https://ftpmirror.gnu.org/binutils/binutils-2.28.tar.bz2
wget https://ftpmirror.gnu.org/gcc/gcc-6.3.0/gcc-6.3.0.tar.gz
tar xf gcc-6.3.0.tar.gz
tar xf binutils-2.28.tar.bz2
Please note, most likely you would like to download the corresponding SHA1 to verify the archives.
Sysroot
To be able to compile things, we need a part of sysroot to be present on our build machine. As shown here, you could simply start your Raspbian on the boards and then rsync the network required libs and includes to the host machine. However, we will do this by mounting the image via a loop device and use qemu to install build dependencies. We need a copy of libs and headers, because we want to modify and adjust the symlinks in our sysroot.
- Let's extract the Raspbian image:
cd ~/workspaces/raspberrypi-raspbian/image
unzip 2019-04-08-raspbian-stretch.zip
- We add at least 2G space to the image to be able to fit qt build with debug info:
dd if=/dev/zero bs=1M count=2048 >> 2019-04-08-raspbian-stretch.img
- Make loopback devices for the image:
losetup -fP 2019-04-08-raspbian-stretch.img
losetup -a
/dev/loop0: []: (~/raspberrypi-raspbian/image/2019-04-08-raspbian-stretch.img)
- Check the partition layout and note the start sector of the root partition (here /dev/loop0p2):
fdisk -u -l /dev/loop0

Disk /dev/loop0: 5.2 GiB, 5628755968 bytes, 10993664 sectors
Units: sectors of 1 * 512 = 512 bytes
Sector size (logical/physical): 512 bytes / 512 bytes
I/O size (minimum/optimal): 512 bytes / 512 bytes
Disklabel type: dos
Disk identifier: 0xcd48578f

Device       Boot Start     End Sectors  Size Id Type
/dev/loop0p1       8192   96042   87851 42.9M  c W95 FAT32 (LBA)
/dev/loop0p2      98304 6799359 6701056  3.2G 83 Linux
- Recreate second partition to use extra space:
fdisk /dev/loop0

# Type d to proceed to delete a partition.
# Type 2 to select the 2nd partition and press enter.
# Type n to add the partition
# Type p to select primary partition
# Type 2 to select partition number
# Type 98304 as first sector
# Type Enter to select default last sector
# Type N to keep the signature
# Type w to save partition table and exit
- Finally resize partition:
e2fsck -f /dev/loop0p2
resize2fs /dev/loop0p2
- Copy static qemu binary to image (setup binfmt_misc and qemu interpreter is distro specific and therefore beyond this guide)
cp /usr/bin/qemu-arm /media/card/usr/bin/
- Mount the root partition:
mount /dev/loop0p2 -t ext4 /media/card
mount --bind /dev /media/card/dev
mount --bind /sys /media/card/sys
mount --bind /proc /media/card/proc
mount --bind /dev/pts /media/card/dev/pts
- chroot to sysroot and get qt5 build dependencies in. Note that we are going to use mk-build-deps to create dummy package, so we can uninstall dependencies when no longer needed:
cd /media/card/
chroot . bin/bash
# uncomment the deb-src line
vi /etc/apt/sources.list
apt update
apt install devscripts
mk-build-deps libqt5gui5
apt install ./qtbase-opensource-src-build-deps_5.7.1+dfsg-3+rpi1+deb9u1_armhf.deb
apt install libnss3 libnss3-dev
exit
- rsync the parts that we need:
cd ~/workspaces/raspberrypi-raspbian
rsync -av /media/card/lib sysroot
rsync -av /media/card/usr/include sysroot/usr
rsync -av /media/card/usr/lib sysroot/usr
- Adjust symlinks to be relative:
wget https://raw.githubusercontent.com/Kukkimonsuta/rpi-buildqt/master/scripts/utils/sysroot-relativelinks.py
chmod +x sysroot-relativelinks.py
./sysroot-relativelinks.py sysroot
- Cleanup image (optional)
cd /media/card/
chroot . bin/bash
apt remove devscripts qtbase-opensource-src-build-deps libnss3-dev
apt autoremove
apt clean
exit
- Umount no longer needed mounts
umount /media/card/sys /media/card/proc /media/card/dev/pts /media/card/dev
Toolchain
To compile Qt, we need a cross-compiler toolchain. There are many excellent tools to compile a toolchain, such as crosstool-ng or buildroot. However, we choose to compile GCC from scratch. Compiling a compiler is a bit tricky and includes a few tasks:
- Installing Linux headers that are required to make system calls from the C library and to compile it
- Building biuntils to get a cross-linker, a cross-assembler, and some other tools using your host compiler
- Building the first stage GCC (bootstrapping), to have a basic compiler with C language support and static linking
- Building the C library using the first stage compiler
- Building a second stage GCC, which uses the C library, supports dynamic linking and the C++ language
We already have GlibC compiled in our sysroot shipped by Rasbian, so we are going to cheat here a bit and skip the bootstrapping of GCC and the building of GlibC itself. We can simply use sysroot directly and just compile the linker, the assembler and final cross-compiler.
- Let's do initial setup:
export WORKSPACE_ROOT=~/workspaces/raspberrypi-raspbian/toolchain
export PREFIX=${WORKSPACE_ROOT}/toolchain
export TARGET=arm-linux-gnueabihf
export SYSROOT=${WORKSPACE_ROOT}/../sysroot
export PATH=${PREFIX}/bin:$PATH
mkdir -p ${PREFIX}
cd ${WORKSPACE_ROOT}
- Let's build the linker and assembler:
mkdir -p build/binutils
pushd build/binutils
../../sources/binutils-2.28/configure --target=${TARGET} --prefix=${PREFIX} --with-arch=armv6 --with-fpu=vfp --with-float=hard --disable-multilib
make -j12
make install
popd
- We need additional GMP, MPFR and MPC libraries to be able to build GCC. This can be easily set up by running script in the GCC source directory.
cd ~/workspaces/raspberrypi-raspbian/toolchain/sources/gcc-6.3.0
contrib/download_prerequisites
- Let's now build GCC:
mkdir -p build/gcc2
pushd build/gcc2
../../sources/gcc-6.3.0/configure --prefix=${PREFIX} --target=${TARGET} --with-sysroot=${SYSROOT} --enable-languages=c,c++ --disable-multilib --enable-multiarch --with-arch=armv6 --with-fpu=vfp --with-float=hard
make -j12
make install
popd
Note that I got a compiler error, so you might have to edit raspberrypi-raspbian/toolchain/sources/gcc-6.3.0/gcc/ubsan.c line 1474 and change it to:
|| xloc.file[0] == '\0' || xloc.file[0] == '\xff'
Compiling Qt
As shown here, we could do a top level build of Qt, but we are going to do prefix module builds just to show an alternative way of building Qt. We need three repositories to have Qt WebEngine up and running: qtbase, qtdeclarative and qtwebengine. It is important to configure Qt with linux-rasp-pi3-vc4-g++ device, since this spec contains newer vc4 OpenGL drivers. We also compile two back-ends for QPA: xcb to run it in the Rasbian window manager and eglfs to run as a full-screen single-window application.
- Let's configure qtbase, compile it and install it:
cd ~/workspaces/raspberrypi-raspbian/qt/qt5
git clone git://code.qt.io/qt/qtbase.git
git checkout 5.13.1
mkdir -p ~/workspaces/raspberrypi-raspbian/qt/build/qtbase
cd ~/workspaces/raspberrypi-raspbian/qt/build/qtbase
~/workspaces/qt/qt5/qtbase/configure -release -opengl es2 -device linux-rasp-pi3-vc4-g++ \
    -device-option CROSS_COMPILE=~/workspaces/raspberrypi-raspbian/toolchain/toolchain/bin/arm-linux-gnueabihf- \
    -opensource -confirm-license -nomake tests -nomake examples -verbose -no-pch -eglfs -xcb \
    -sysroot /home/stefan/workspaces/raspberrypi-raspbian/sysroot \
    -prefix /usr/local/qt/5.13 \
    -extprefix /opt/qt/5.13/raspbian/sysroot \
    -hostprefix /opt/qt/5.13/raspbian
make
make install
- Compile qtdeclarative and install it:
cd ~/workspaces/raspberrypi-raspbian/qt/qt5
git clone git://code.qt.io/qt/qtdeclarative.git
git checkout 5.13.1
mkdir -p ~/workspaces/raspberrypi-raspbian/qt/build/qtdeclarative
cd ~/workspaces/qt/build/qtdeclarative
/opt/qt/5.13/raspbian/bin/qmake ~/workspaces/qt/qt5/qtdeclarative
make
make install
- Compile qtwebengine and install it:
cd ~/workspaces/raspberrypi-raspbian/qt/qt5
git clone git://code.qt.io/qt/qtwebengine.git
git submodule init
git checkout 5.13.1
git submodule update
mkdir -p ~/workspaces/raspberrypi-raspbian/qt/build/qtwebengine
cd ~/workspaces/raspberrypi-raspbian/qt/build/qtwebengine
/opt/qt/5.13/raspbian/bin/qmake ~/workspaces/qt/qt5/qtwebengine -- --no-feature-webengine-arm-thumb
make
make install
- Compile the Simple Browser example:
mkdir -p ~/workspaces/raspberrypi-raspbian/qt/build/simplebrowser
cd ~/workspaces/raspberrypi-raspbian/qt/build/simplebrowser
/opt/qt/5.13/raspbian/bin/qmake ~/workspaces/qt/qt5/qtwebengine/examples/webenginewidgets/simplebrowser
make
Deploy
We still have our image mounted form the sysroot step. If you chose to rsync sysroot over the network, just replace the rsync steps below with the equivalent network location of your Rasberry Pi board.
- Deploy with rsync
mkdir -p  /media/card/usr/local/qt/5.13
rsync -av /opt/qt/5.13/raspbian/sysroot/ /media/card/usr/local/qt/5.13
cp ~/workspaces/raspberrypi-raspbian/qt/build/simplebrowser/simplebrowser /media/card/usr/local/bin/
- Unmount the image
umount /media/card
- Copy the image to the SD card (replace sdX with the device on your machine):
cd ~/workspaces/raspberrypi-raspbian/image
dd if=2019-04-08-raspbian-stretch.img of=/dev/sdX bs=4M
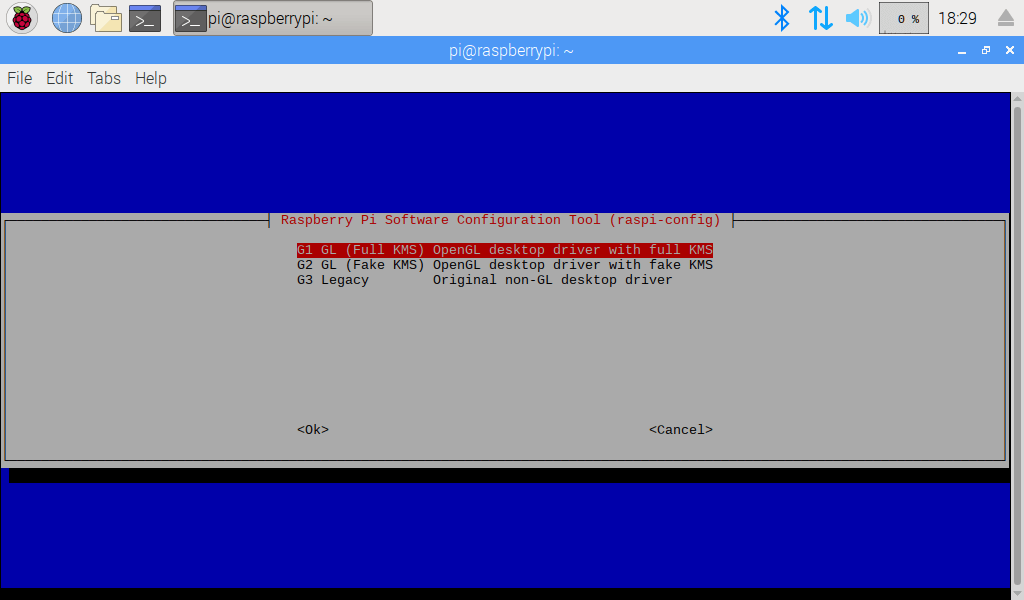
- Boot the image up, and switch to enable OpenGL (Full KMS):
raspi-config
- Fix run-time linker search paths
echo /usr/local/qt/5.13/lib > /etc/ld.so.conf.d/00-qt.5.13.conf
ldconfig
- Reboot
- To run Simple Browser within Raspbian Desktop (former PIXEL Desktop) open console or SSH:
export DISPLAY=:0
export QTWEBENGINE_DISABLE_GPU_THREAD=1
/usr/local/bin/simplebrowser -platform xcb
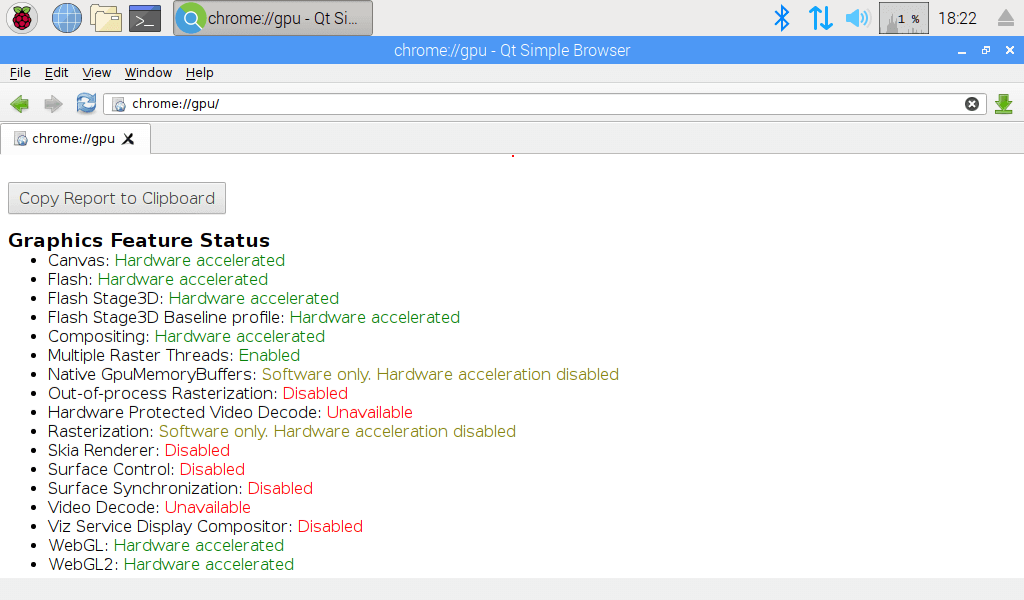
- Navigate to chrome://gpu/, and you should see:
- Navigate to https://get.webgl.org/, and you should see:
- To run without x11 , SSH to the device and shut down the login manager:
systemctl stop lightdm
export QTWEBENGINE_DISABLE_GPU_THREAD=1
/usr/local/bin/simplebrowser -platform eglfs


