Install new kit to Qt Design Studio
DISCLAIMER: The procedure is only to be followed by EXPERT users of Qt Design Studio. Creating a non-standard setup with Qt Design Studio can result in incorrect behavior which is not covered with standard support.
For Qt Design Studio 4.5 build, the compiler version for MSVC is 2019. For later versions (Qt Design Studio 4.6 =>) the compiler is MSVC 2022.
Qt Design Studio comes preinstalled with Qt6 kit (as of in Qt DS4). This kit is a stripped-down version of Qt and cannot be used in production.
You need to change the configuration of the Qt Design Studio for a custom setup. This document describes the steps to use Qt Design Studio with an environment based on the standard Qt kit installation.
This describes the workflow for enabling a custom kit on the Windows environment.
Enable the Settings
Locate QtDesignStudio.ini file. This is stored in the same directory structure where Qt Design Studio is installed. On windows Qt is usually installed to C:\Qt directory. So the the path to Qt Design Studio ini file is:
C:\Qt\Tools\QtDesignStudio\share\qtcreator\QtProject\QtDesignStudio.ini
At this point, you should TAKE A BACKUP of the .ini file. In some cases, the file gets destroyed, and you cannot recover from it. Open the file with a text editor, and find where Qt Creator item visibility is controlled:
[General]
HideOptionCategories=C++, Debug, Designer, Kits, BuildAndRun, CPaster, LanguageClient, Version Control
SuppressedWarnings=LinkWithQtInstallation
Remove 'Kits' and 'BuildAndRun' from the options and save the file.
NOTICE: You might need administrator rights to edit the file.
Start Qt Design Studio and continue to configure a kit.
Configure the Kit for Use
NOTICE: The customized kit should be the same version from baseline as the original kit from Qt Design Studio or it might not operate correctly.
First, check the version of the Qt kit that Qt Design Studio is currently using; it is in the bottom toolbar.

To get the kit configuration options, select Edit > Preferences > Kits > Qt Versions.
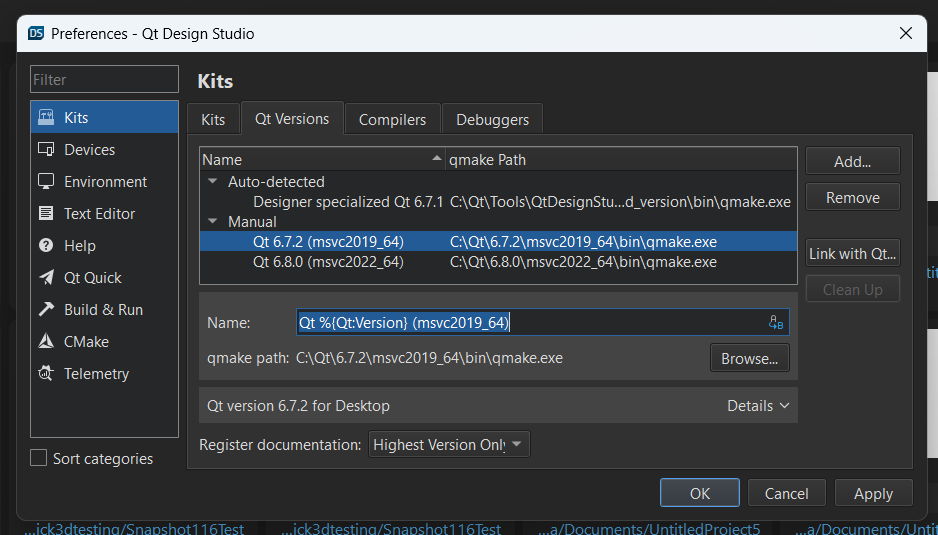
In this tutorial, we are using Qt 6.7.2 as a kit (it is compatible with Qt 6.7.1).
Setting up a Qt kit is a two-step operation: First, you need to set the Qt Version, and then assign this to your kit.
Qt Version
To configure the Qt Version you need to find the 'qmake' binary from the build. This is located in:
<QTDIR>/<Qt Version>/<Arch>/bin
First, open the Qt Versions tab in the kit management dialog:

Select Add..., and from the next window browse and select the 'qmake' of your target environment. In our case, it can be found in this location:
C:\Qt\6.7.2\msvc2019_64\bin\qmake
Select 'OK', and proceed to the next step.
Qt Kit
Now that the Qt Version is set, you need to define a kit that uses this version. To open the kit management, go to Edit > Preferences > Kits > Kits.
To add the kit here, select 'Add...', it expands the fields below.
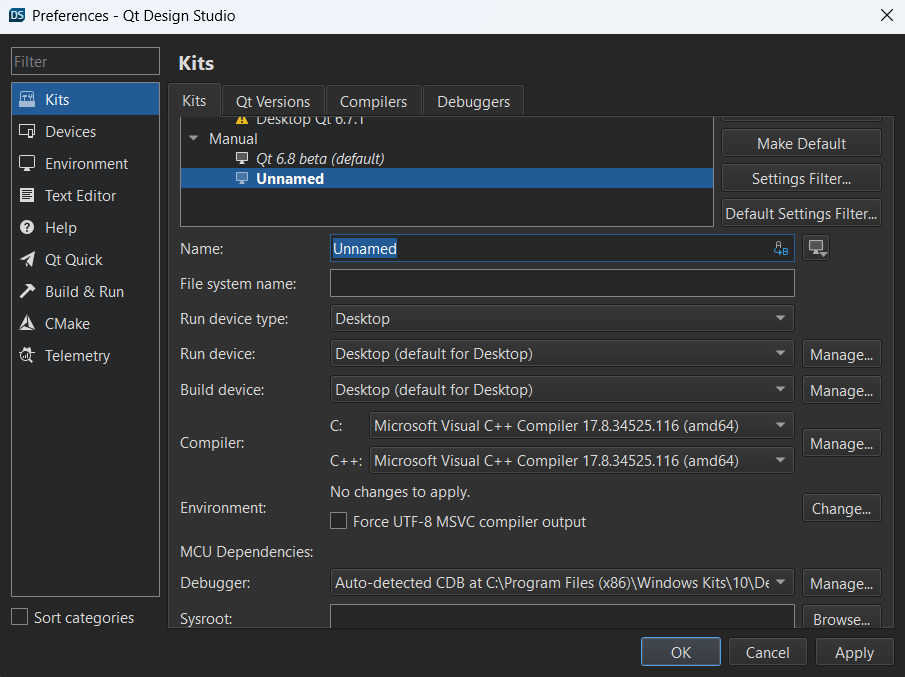
Here, you need to update two fields, Name, and Qt Version. You can give any Name you want, however, for clarity you should follow this format of naming (see the next image for reference):
<Qt Version> <Intended Usage/Platform>
Select the Qt Version from the dropdown.
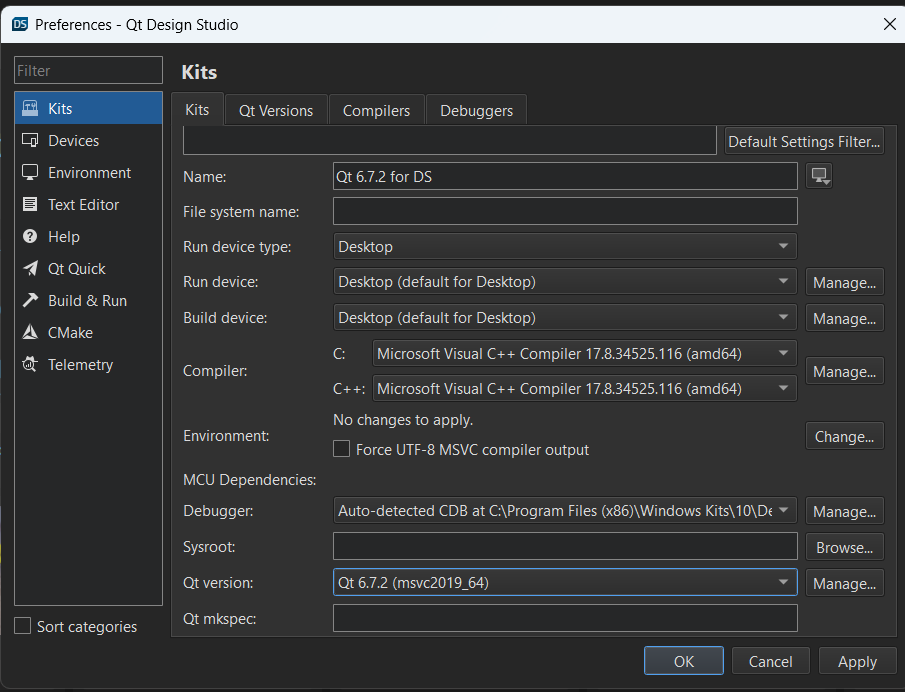
Select, OK to add the new kit.
The new kit is set now, however, it is not fully functional yet. Restart Qt Design Studio to make the changes effective.
Qt Kit Preparation
Qt Modules
Qt Design Studio kit requires these two Qt Libraries:
- Qt Quick Timeline
- Qt Shader Tools
If you don't have them, use the Maintenance Tool in the Qt folder to install them.
Qt Studio Components
Qt Design Studio uses a special library called Studio Components. This is a set of important QML types which are not yet part of the Qt offering. You need to install it manually. Use Qt Creator and follow the steps below:
1. Opening Studio Components Project in Qt Creator
Download or clone a copy of the Studio Components from the Qt Labs. You can find it from the link below:
Open Qt Creator, then browse to and open the CMakeFiles.txt file from the downloaded Design Components folder. Qt Creator does the additional configurations automatically.
2. Setting up the Build
First, open the Projects view in Qt Creator by selecting the wrench icon on the sidebar.

Then, select Build.
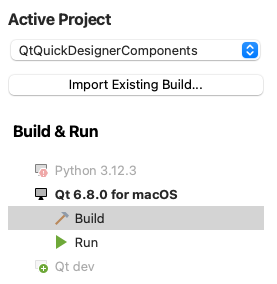
From the Build Settings, select Install. Then, close the settings.
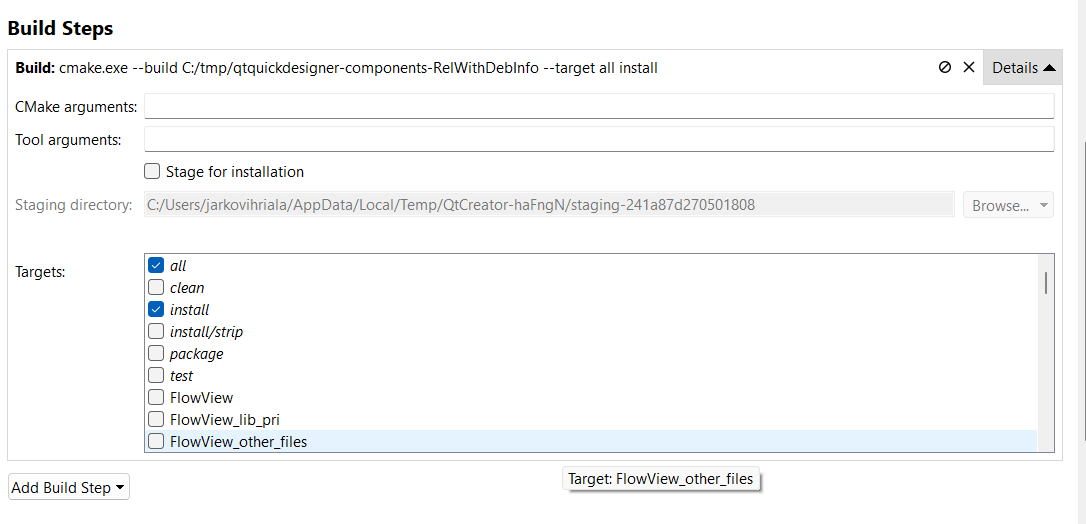
Select Compile to finalize the process.

QML Puppet
NOTICE: In some cases, the QML Puppet recompilation is not needed. However, it is safe to compile; especially if the kit has C++ libraries that differ from the original kit.
Before starting with QML Puppet, make sure you,
- Know the version of your Qt Design Studio.
- Know the Kit you are building against.
- Have a functional Qt Kit (tools such as CMake and Ninja working correctly).
- Have Qt Timeline, Qt 5 Compatibility Module, and Qt Shader Tools installed in the Qt Kit.
The QML Puppet is Qt Design Studio's runtime tool to run a QML project. Its sources are part of the Qt Creator repository. Regardless of the license used, you can find the sources from the link below.
NOTICE: Git gives you the master branch by default. You need to switch to the branch matching your Qt Design Studio. For this example, we use qds/4.5 branch.
QML Puppet sources are in the sub-folder:
src/tools/qml2puppet
Find the CMakeFiles.txt file in this folder, open it with the Qt Creator, and then define your build environment.
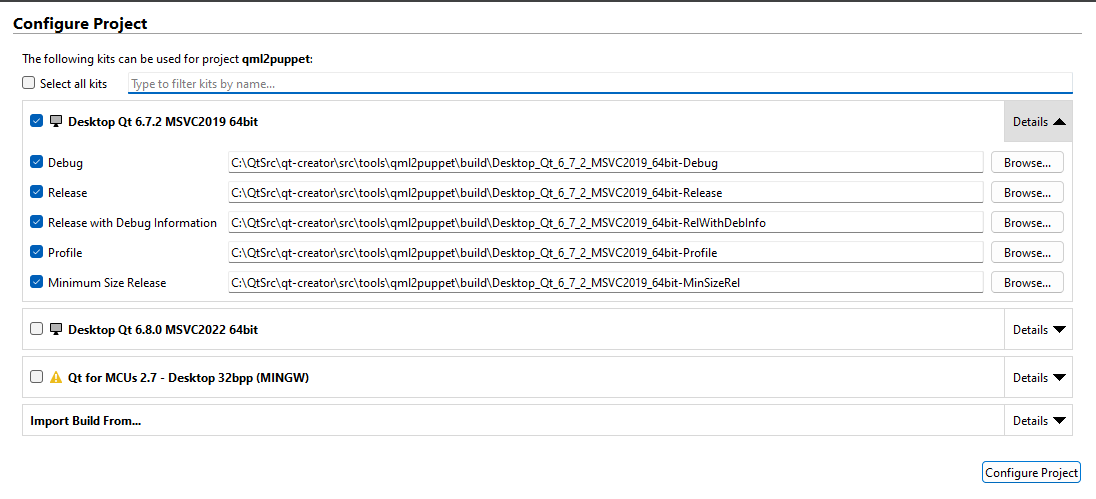
Some helper options are available to simplify the process. In the CMake environment, select the BUILD_DESIGNSTUDIO option from the list before compiling.
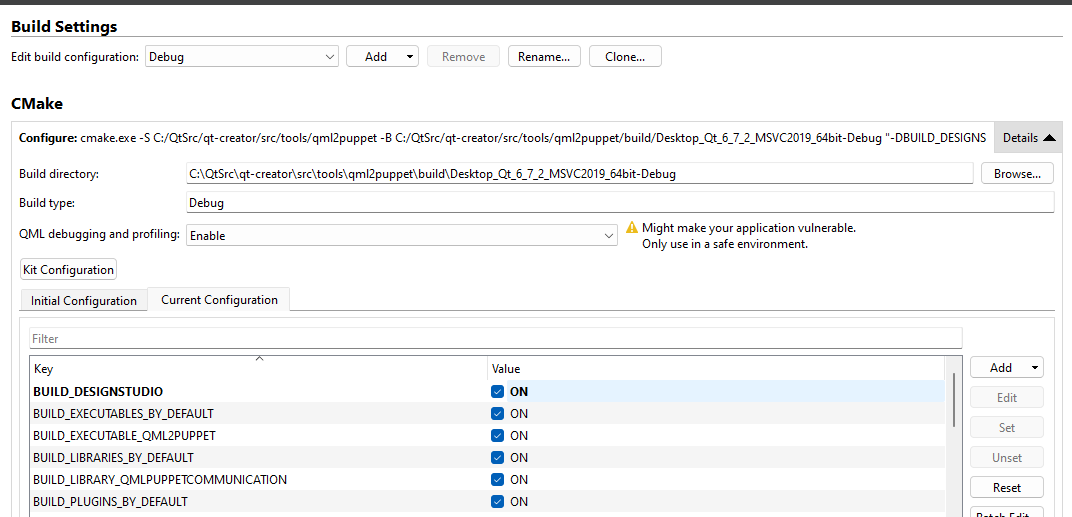
With these settings, the puppet is automatically compiled and linked with the correct filename (with version).
By default Qt Creator build environment is set to 'Debug'. You can change this from the build target dropdown, it opens from the following control:

We recommend selecting 'Release with Debug Symbols.' This allows you to open the callstack if there is a crash. For this example, we have cloned the sources to the following directory:
C:\QtSrc\qt-creator
So, the full path to the source for the QML Puppet is:
C:\QtSrc\qt-creator\src\tools\qml2puppet
When you build the QML Puppet, Qt Creator creates a build directory where the executable binary is located. In this example, that directory is:
C:\QtSrc\qt-creator\src\tools\qml2puppet\build\Desktop_Qt_6_7_2_MSVC2019_64bit-RelWithDebInfo
Typically, in the Windows environment, the install step is not automatically done for the executables. So, you need to copy the file from your build environment to the kit manually. Copy the binary, 'qml2puppet-<QDS VERSION>.exe', from the build directory to the 'bin' directory of the Qt environment. You can do it manually or follow this command:
copy C:\QtSrc\qt-creator\src\tools\qml2puppet\build\Desktop_Qt_6_7_2_MSVC2019_64bit-RelWithDebInfo\qml2puppet-4.5.1.exe C:\Qt\6.7.2\msvc2019_64\bin
The kit is ready now. You can run and display UI projects from Qt Design Studio.