Qt for OpenHarmony/zh
中文 English
HarmonyOS 介绍
HarmonyOS是开放原子基金会孵化并运营的开源项目,目标是构建智能终端设备操作系统的框架与平台,旨在面向全场景、全连接、全智能时代的到来,推动万物互联产业的蓬勃发展。
华为 DevEco Studio 安装
如果您想开发Qt for HarmonyOS应用程序,除了使用Qt Creator之外,还需要依赖DevEco Studio。
https://developer.huawei.com/consumer/cn/deveco-studio/
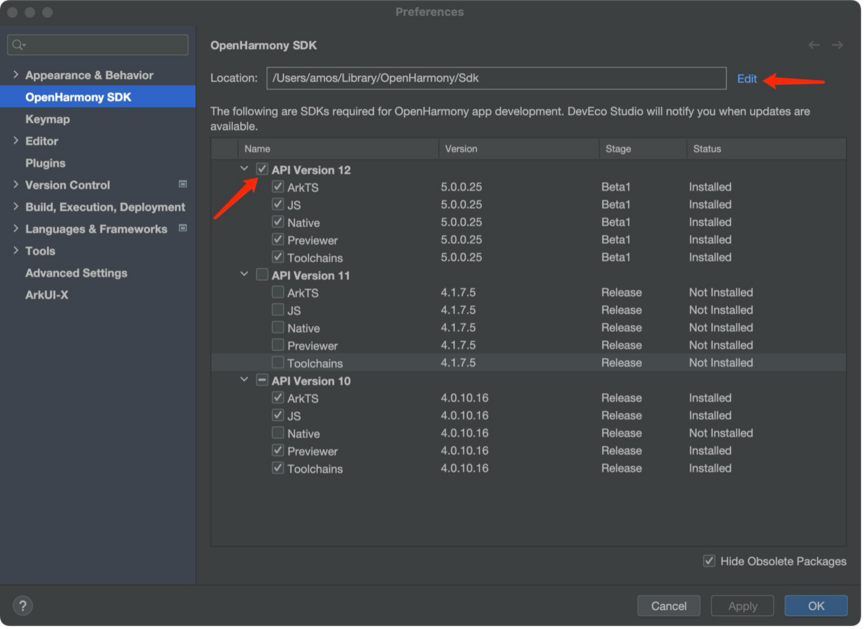
一般情况下,不需要配置DevEco Studio使用的sdk版本,因为DevEco Studio默认自带了一个sdk。
但是如果包含的sdk不能满足你的需求,你可以通过下面的方法设置你想要使用的sdk版本:
对于 HarmonyOS 5,您需要安装 API 版本 为12 的SDK:
为了避免因开发环境导致的任何问题,请首先确认是否可以使用 DevEco Studio 来开发 Arkts 应用程序。
Gerrit 简介
Qt 源代码托管在 Gerrit 上,用于代码审查和版本控制。有关如何使用 Gerrit 的所有必要信息都可以在以下页面查看:
如何获取 Qt for HarmonyOS 源代码
- 访问并登录: https://codereview.qt-project.org。
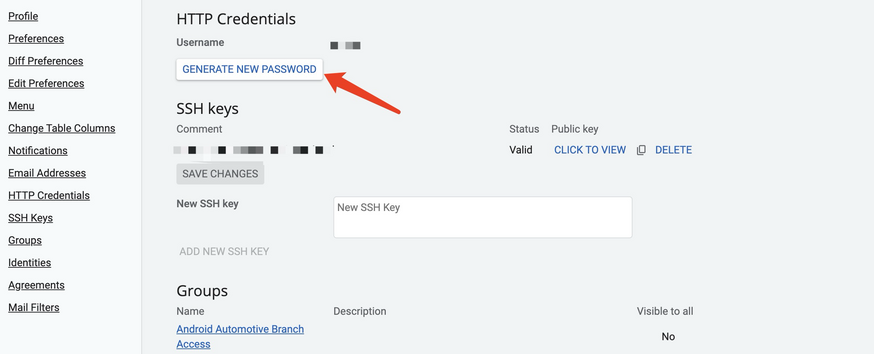
- 点击右上角的“设置”,打开设置页面。
- 点击“设置”->“HTTP 凭证”->“生成新密码”生成新密码。保存密码以便稍后使用“git clone”使用。
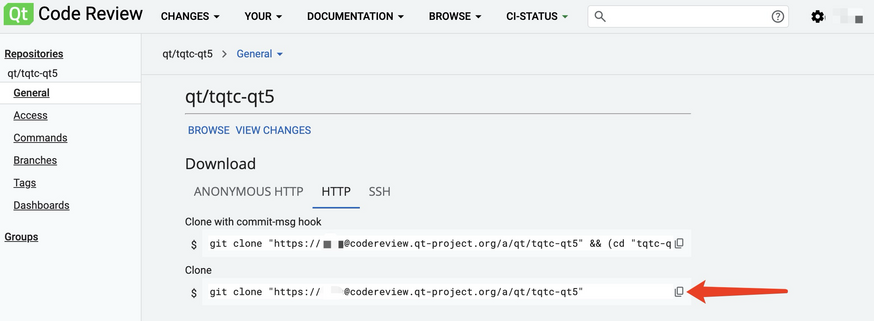
- 访问 https://codereview.qt-project.org/admin/repos/qt/tqtc-qt5, 并克隆git 仓库地址。
- cd tqtc-qt5
- 切换分支:git checkout tqtc/harmonyos-5.12.12 or git checkout tqtc/harmonyos-5.15.16
- 更新子模块:git submodule update --init --recursive

在 macOS 中为 Qt for HarmonyOS 构建 Qt 库
准备第三方依赖项
以下说明只是基于 macOS Sonoma 14.0进行准备, 并不代表最低依赖条件。
- git 版本 2.39.3
- python 3.12.0
系统环境变量
打开 ~/.zshrc 或者~/.bashrc ,并添加一下内容:
local HARMONY_OS_API_VER=12
local HOME_LIBRARY=${HOME}/Library
export OHOS_SDK_ROOT=${HOME_LIBRARY}/OpenHarmony/Sdk
export HOS_SDK_HOME=${HOME_LIBRARY}/OpenHarmony/Sdk
export OHOS_SDK_12=${HOS_SDK_HOME}/${HARMONY_OS_API_VER}
export NATIVE_OHOS_SDK=${OHOS_SDK_12}/native
构建 Qt 源代码
您可以使用以下脚本以 arm64-v8a 为目标构建 Qt。
请填写您本地源目录的路径。
#!/bin/sh

# Target architecure
ARCH="arm64-v8a"

# Source and build directories
QT5_ROOT_DIR=<ENTER PATH TO YOUR qt/qt5 DIRECORY>
QT5_BUILD_DIR="$QT5_ROOT_DIR/build_${ARCH}"

# Prepare build directory
mkdir "$QT5_BUILD_DIR"
cd "$QT5_BUILD_DIR"

../configure \
    -v \
    -xplatform ohos-clang \
    -prefix /data/storage/el1/bundle/libs/arm64 \
    -extprefix ${NATIVE_OHOS_SDK}/opt/Qt/5.12.12/ohos-${ARCH}-clang/ \
    -opensource \
    -confirm-license \
    -release \
    -no-use-gold-linker \
    -no-gcc-sysroot \
    -ohos-arch ${ARCH} \
    -opengles3 \
    -skip qt3d -skip qtactiveqt -skip qtandroidextras -skip qtcanvas3d \
    -skip qtconnectivity -skip qtdatavis3d -skip qtdoc -skip qtdocgallery -skip qtfeedback \
    -skip qtgamepad -skip qtgraphicaleffects -skip qtlocation -skip qtmacextras -skip qtnetworkauth \
    -skip qtpim -skip qtpurchasing -skip qtqa -skip qtremoteobjects -skip qtrepotools \
    -skip qtscript -skip qtscxml -skip qtsensors -skip qtserialbus -skip qtserialport \
    -skip qtspeech -skip qtsystems -skip qttools -skip qttranslations -skip qtvirtualkeyboard \
    -skip qtwayland -skip qtwebchannel -skip qtwebengine -skip qtwebglplugin -skip qtwebsockets \
    -skip qtwebview -skip qtwinextras -skip qtx11extras -skip doc \
    -no-dbus \
    -c++std c++14 \
    -nomake examples \
    -nomake tests
然后,
make -j16
make install
注意:如果你需要openssl的相关特性,请执行configure命令的时候添加以下选项:
-openssl-runtime -I"${QT_SOURCE_DIR_OPENSSL}" -ssl
其中变量${QT_SOURCE_DIR_OPENSSL}代表openssl头文件的路径, openssl的头文件可以从这个地址获得:https://gitee.com/openharmony/third_party_openssl/tree/master/include/openssl
在 macOS 中为 HarmonyOS 构建 Qt 应用程序
在 Qt Creator 中为 HarmonyOS 创建开发工具包
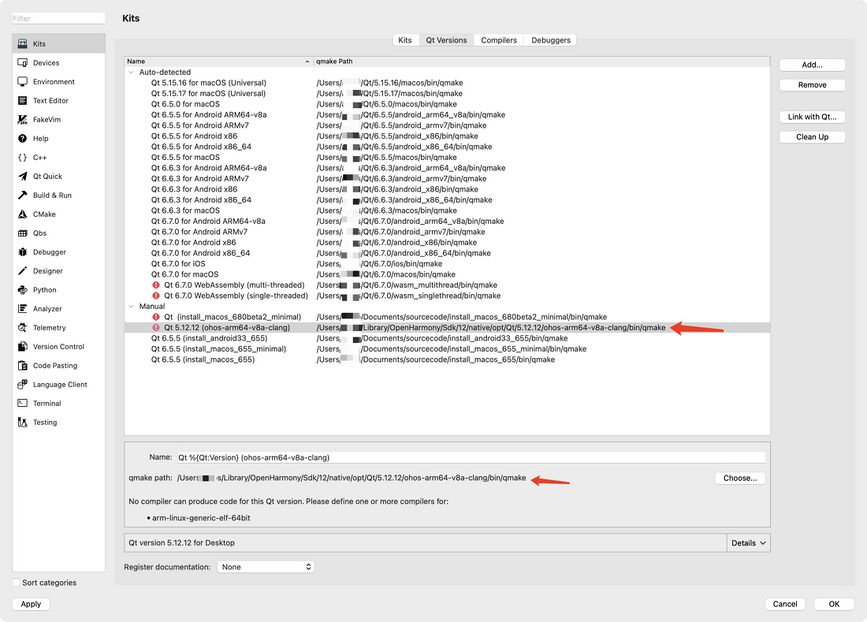
转到 Preferences → Kits → Qt Versions. 单击添加 Add….按钮
配置 Qt 版本
选择编译Qt for HarmonyOS源代码生成的 qmake文件:
配置 编译器
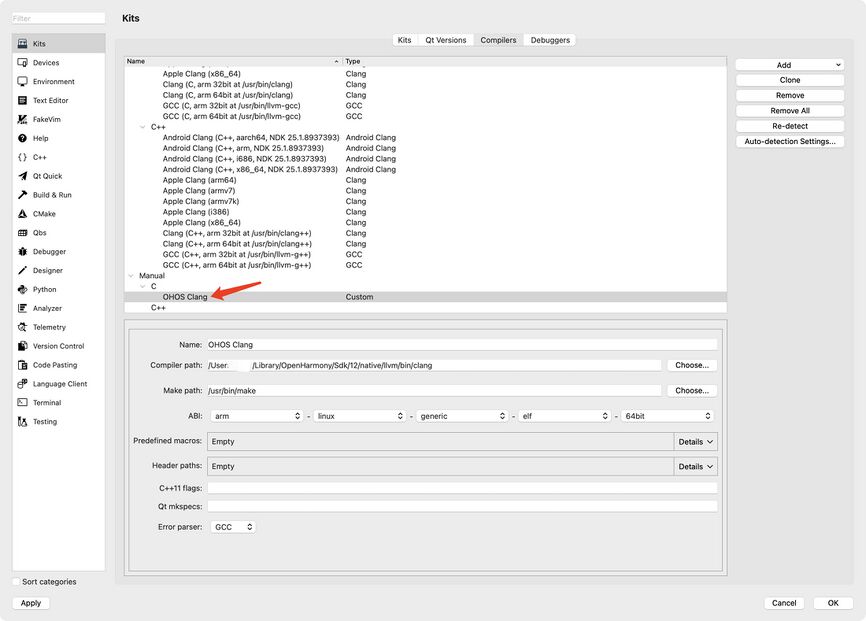
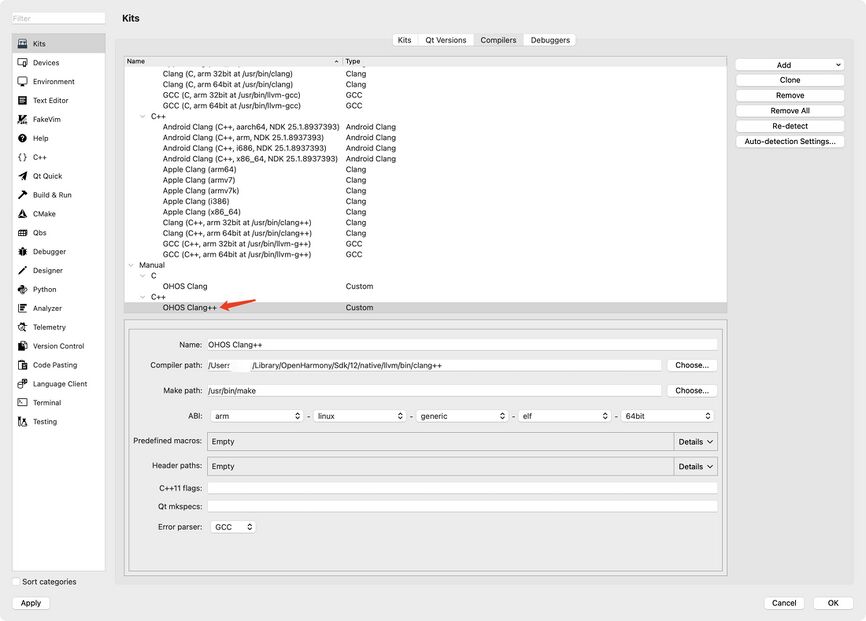
转到 Compilers 选项卡. 单击 Add 按钮,,然后选择 Custom → C.
设置填写:
Name: OHOS Clang
Compiler path: /path/to/OpenHarmony/Sdk/12/native/llvm/bin/clang
Make Path: /usr/bin/make
ABI: arm - linux - generic - elf - 64bit
对于 C++ 编译器,请按照上述步骤操作。不过,请确保将名称设置为 OHOS Clang++,并在编译器路径中选择
并使用 clang++。
配置套件
转到 Kits 选项卡。
单击 Add按钮。
在 Qt Creator 中设置所需的环境变量
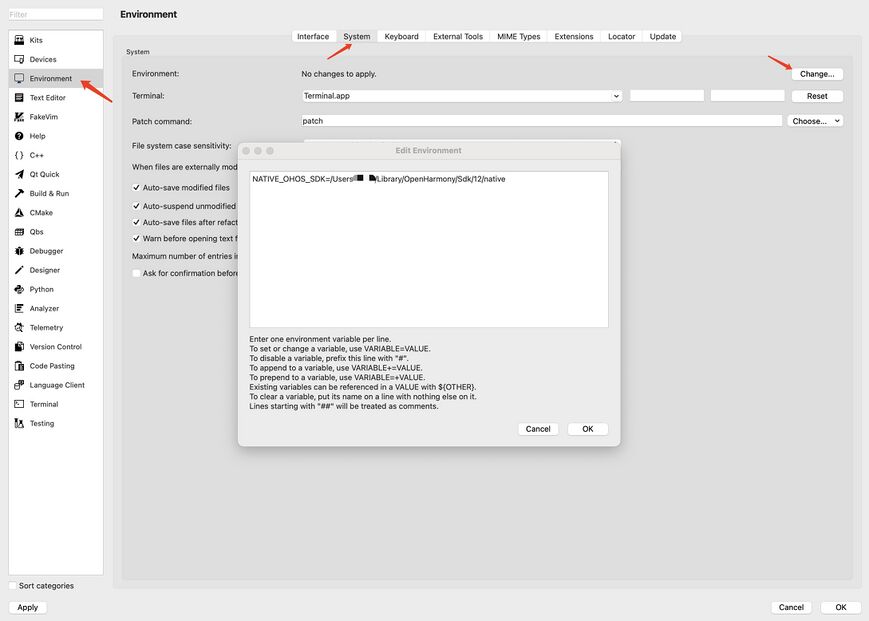
转到 Preferences → Environment → System ,然后单击环境中系统选项的 Change… 按钮.
通过添加一行来添加新的环境变量:
NATIVE_OHOS_SDK=/path/to/OpenHarmony/Sdk/12/native
在 Windows 中为 HarmonyOS 构建 Qt 库
准备构建环境
- 使用 --recursive 参数从 Gerrit 克隆 qt5 存储库以获取所有子模块,Qt for HarmonyOS/zh#如何获取 Qt for HarmonyOS 源代码。
- 安装 DevEco Studio 并从其 SDK 管理器中下载HarmonyOS/native 包,Qt for HarmonyOS/zh#华为 DevEco Studio 安装。
- 下载 MinGW 工具链
例如 llvm-mingw-20230919-ucrt-x86_64.zip from Releases · mstorsjo/llvm-mingw 解压并将文件夹复制到 d:\
- 安装Perl
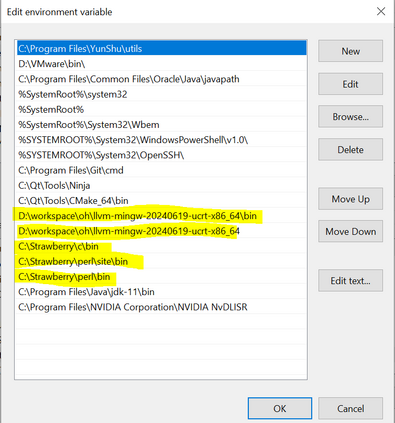
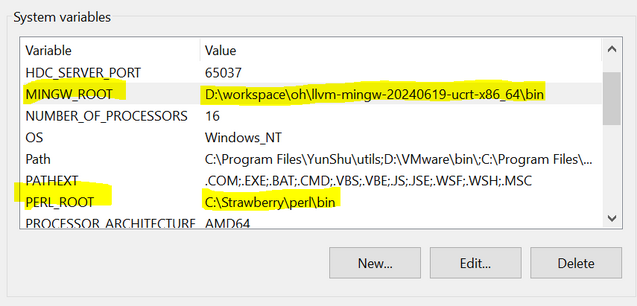
- 将MinGW 和Perl路径添加到 PATH 环境变量中,如下所示:
- 另外在系统环境变量中添加 MINGW_ROOT 和 PERL_ROOT :
- 打开命令提示符 (使用CMD工具) ,并按照一下方式设置环境变量:
REM set NATIVE_OHOS_SDK
SET NATIVE_OHOS_SDK=D:\oh\DevEcoStudio\sdk\HarmonyOS-NEXT-DB6\openharmony\native

REM set OHOS_SDK_SYSROOT
SET OHOS_SDK_SYSROOT=%NATIVE_OHOS_SDK%\sysroot

REM set LLVM_INSTALL_DIR
SET LLVM_INSTALL_DIR=%NATIVE_OHOS_SDK%\llvm

REM set Qt source directory
SET QT5_ROOT_DIR=D:\oh\tqtc-qt5
构建
- 使用相同的命令提示符找到你的 qt5 仓库目录并创建与之并行的build目录(不要设置build目录是 qt5 仓库目录的子目录)。然后转到 build 目录,设置一个包含跳过的部分子模块的变量并运行 configure命令:
REM set QT_SKIPS
SET QT_SKIPS=-skip qt3d -skip qtactiveqt -skip qtandroidextras -skip qtcanvas3d -skip qtconnectivity -skip qtdatavis3d -skip qtdoc -skip qtdocgallery -skip qtfeedback -skip qtgamepad -skip qtgraphicaleffects -skip qtlocation -skip qtmacextras -skip qtnetworkauth -skip qtpim -skip qtpurchasing -skip qtqa -skip qtremoteobjects -skip qtrepotools -skip qtscript -skip qtscxml -skip qtsensors -skip qtserialbus -skip qtserialport -skip qtspeech -skip qtsystems -skip qttools -skip qttranslations -skip qtvirtualkeyboard -skip qtwayland -skip qtwebchannel -skip qtwebengine -skip qtwebglplugin -skip qtwebsockets -skip qtwebview -skip qtwinextras -skip qtx11extras -no-dbus -skip doc
REM  configure command
call ..\tqtc-qt5\configure.bat -v -xplatform ohos-clang -device-option CROSS_COMPILE=%LLVM_INSTALL_DIR%\bin -prefix /data/storage/el1/bundle/libs/arm64 -extprefix c:\Qt\qt-5.12.12-ohos -opensource -confirm-license -debug -no-use-gold-linker %QT_SKIPS% -nomake tests -nomake examples -no-gcc-sysroot -opengles3 -c++std c++14 -ohos-arch arm64-v8a
注意:如果你需要openssl的相关特性,请执行configure命令的时候添加以下选项: -openssl-runtime -I%QT_SOURCE_DIR_OPENSSL% -ssl
-openssl-runtime -I%QT_SOURCE_DIR_OPENSSL% -ssl
其中变量%QT_SOURCE_DIR_OPENSSL%代表openssl头文件的路径, openssl的头文件可以从这个地址获得:https://gitee.com/openharmony/third_party_openssl/tree/master/include/openssl
- 配置成功后,您可以使用 mingw32-make进行构建:
mingw32-make -j8
- 构建成功后,您可以使用以下命令开始安装:
mingw32-make install
在 Windows 中为 HarmonyOS 构建 Qt 应用程序
以下说明内容的前提是,您已经安装了DevEco studio、HarmonyOS工具链,已经有HarmonyOS的设备。
请注意 Qt5 构建 + 多个选项,目前 Arch 是 arm64-v8a。
准备 下载Qt Creator 作为 Qt 开发的IDE
下载 Qt Creator,手动创建HarmonyOS构建套件
在 Qt Creator 中为 HarmonyOS 创建开发工具包
前往编辑 → 偏好设置 → 构建套件
配置 Qt 版本
转到 Qt版本选项卡,单击添加按钮
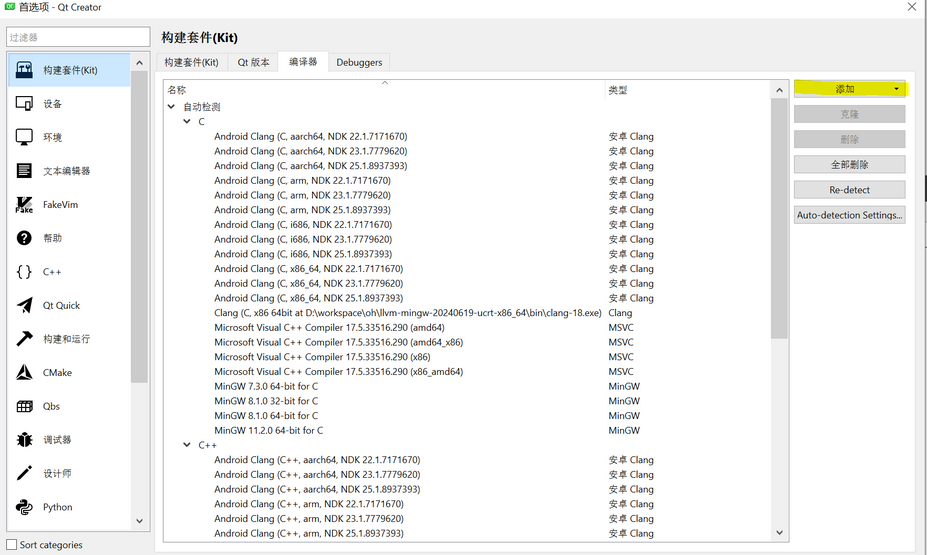
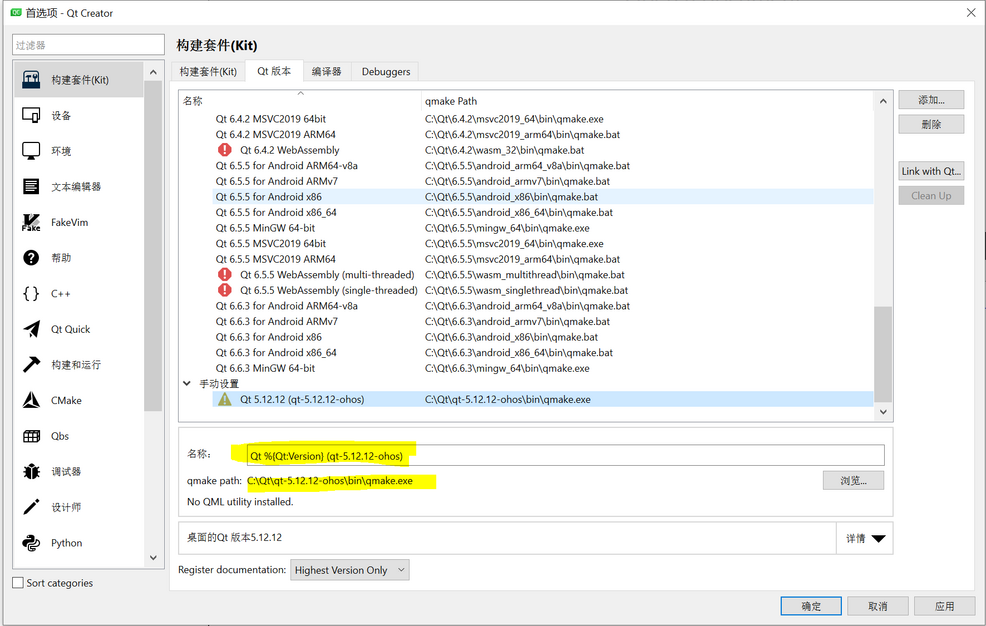
转到安装 Qt 5.12.12 for OHOS 的文件夹(应安装在 PREFIX 指定的路径中),然后转到 bin 文件夹,选择 qmake 应用程序并单击打开。例如,之前使用 PREFIX=C:\Qt\qt-5.12.12-ohos 编译了 Qt 源代码,因此 qmake 将位于 C:\Qt\qt-5.12.12-ohos\bin\qmake。将名称设置为 Qt %{Qt:Version} for OHOS。此时,应该有信息表明没有可以为此 Qt 版本生成代码的编译器。
配置编译器
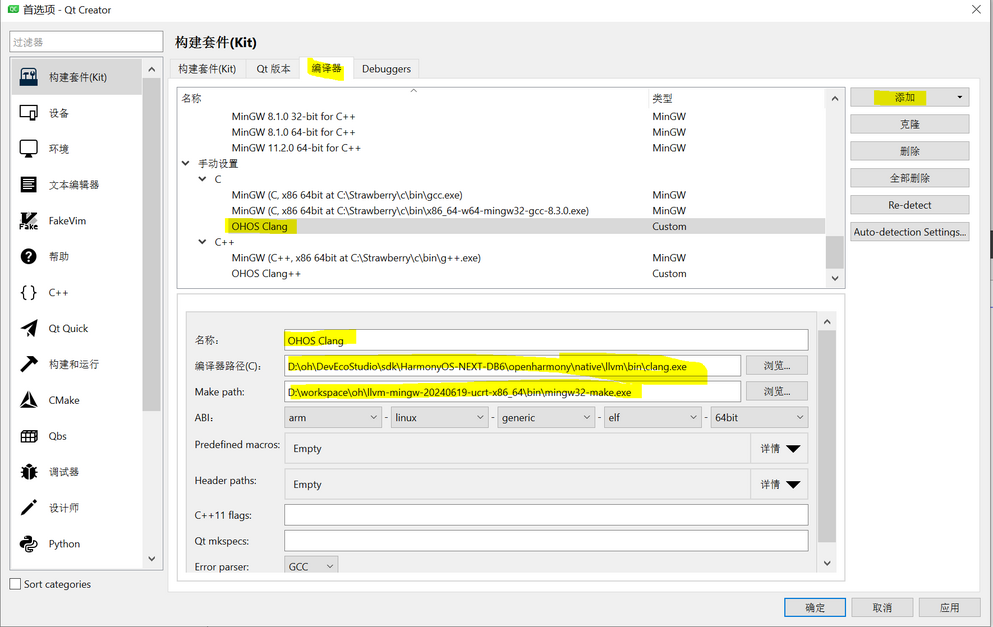
转到“编译器”选项卡。单击“添加”按钮,然后选择“自定义”→“C”
将名称设置为 OHOS Clang。
假设您已按照说明从源代码开始构建 Qt 5.12.12 for OHOS,那么应该已经安装了 llvm-mingw。如果没有,请按照 MinGW 工具链安装步骤执行Qt for HarmonyOS/zh#准备构建环境
将 Make 路径设置为 MinGW 工具链附带的 mingw32-make.exe 可执行文件。它应位于 <path-to-MinGW-toolchain>\bin\mingw32-make.exe。不要忘记将 <path-to-MinGW-toolchain> 替换为实际路径。
将 ABI 更改为arm - linux - generic - elf - 64bit
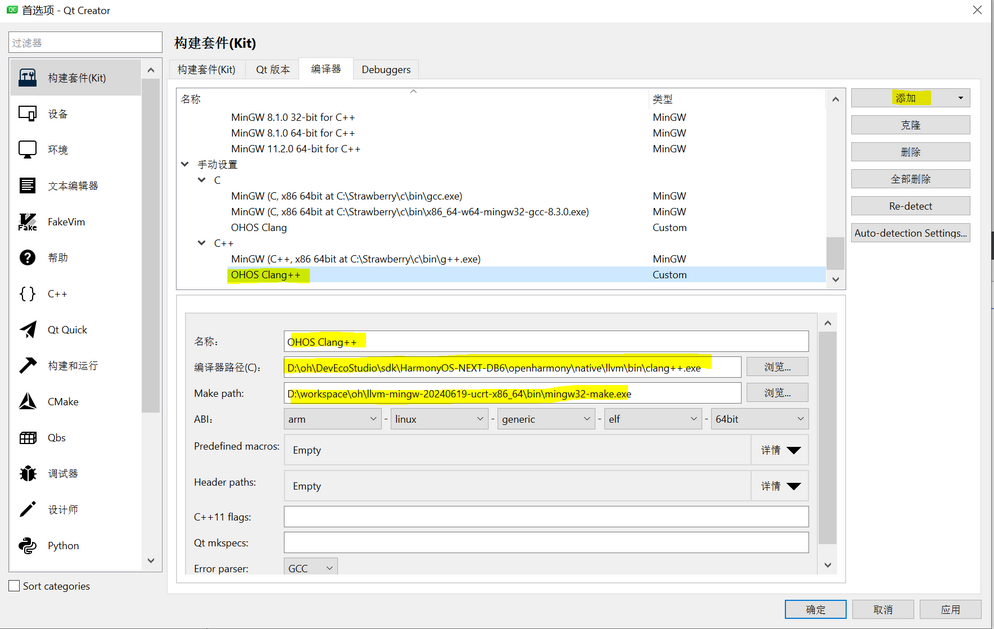
对于 c++ 编译器,请按照上述步骤操作。不过,这次请确保将名称设置为 OHOS Clang++,并在编译器路径中选择 clang++.exe。
配置构建套件
转到 构建套件选项卡,单击添加按钮
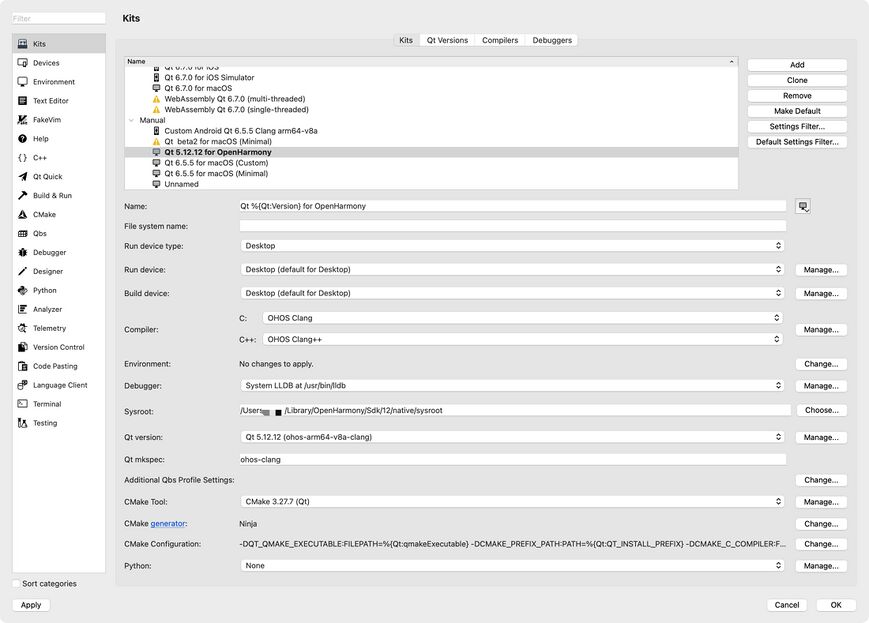
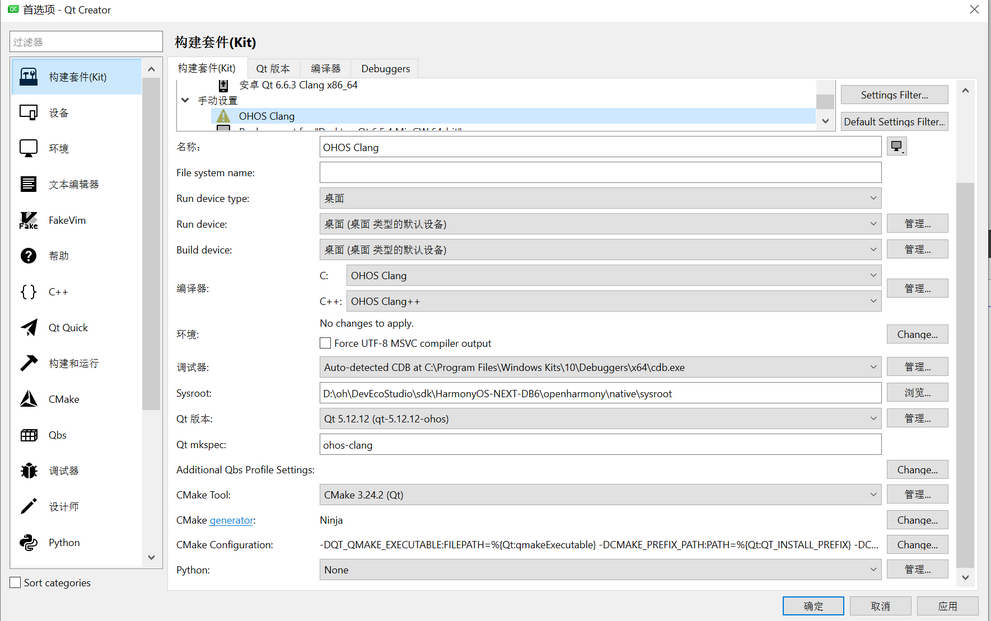
将名称设置为 OHOS Clang
将 Sysroot 设置为 D:\oh\DevEcoStudio\sdk\HarmonyOS-NEXT-DB6\openharmony\native\sysroot。在 Compiler 部分,选择之前配置的 C(OHOS Clang) 和 C++(OHOS Clang++) 编译器。
在 Qt 版本中选择之前为 OHOS 配置的 Qt 5.12.12。
将 Qt mkspec 设置为 ohos-clang。
完整的套件应如下所示:
在 Qt Creator 中设置所需的环境变量
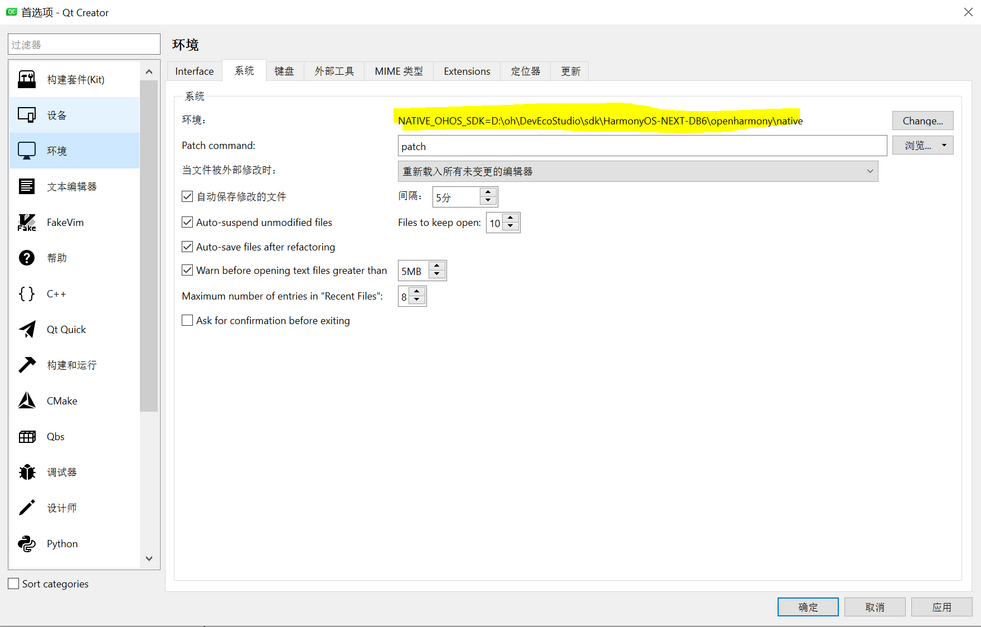
转到编辑→首选项→环境→系统,然后单击环境部分中的Change...按钮。
通过添加一行 NATIVE_OHOS_SDK=D:\oh\DevEcoStudio\sdk\HarmonyOS-NEXT-DB6\openharmony\native 添加新的环境变量
获取 DevEco 项目模板
请联系我们以获取用于构建最终 OpenHarmony Qt 应用程序的 DevEco 项目模板。这将用于在 HarmonyOS 设备上运行 Qt 应用程序。 开发者也可以从以下链接获取最新模版: http://codereview.qtcompany.cn:29416/template/
将 DevEco 项目模板放入已知位置。我们将其命名为 <deveco-project>
转到文件夹 <deveco-project>\entry 并创建一个文件夹 <deveco-project>\entry\libs\arm64-v8a
编译一个简单的 Qt 项目
为了简化此说明,我们不会从头开始创建应用程序,而是使用Qt widget的现有示例。
转到您的 Documents 文件夹并创建一个名为 qt_creator_projects 的新文件夹。然后转到资源管理器中的 <qt5-root>\examples\widgets\widgets 文件夹并将整个计算器文件夹复制到 qt_creator_projects 文件夹中
然后,在 QtCreator 中,单击文件→打开文件或项目,然后转到 qt_creator_projects\calculator 并选择 calculator.pro。
在“配置项目”选项卡中,选择OHOS Clang 套件并单击“配置项目”按钮。
通过单击Build → Build Project “calculator”来触发编译,或者使用快捷键:Ctrl+B。项目应该可以顺利编译。
您应该能够在 Documents\qt_creators_projects\build-calculator-OHOS_Clang-Debug 文件夹中 找到已编译的libcalculator.so文件。
在硬件上运行 Qt for OpenHamony 应用程序
构建最终的 OHOS 应用程序
将上一步中的 libcalculator.so 文件复制到您的 <deveco-project>\entry\libs\arm64-v8a 文件夹中
然后将所需的库从 <qt-install-path>\lib\ 复制到 <deveco-project>\entry\lib\arm64-v8a\
例如,对于 libQt5Widgets.so 库,它的复制方法如下(Powershell):
Copy-Item "<qt-install-path>\lib\libQt5Widgets.so" -Destination "<deveco-project>\entry\libs\arm64-v8a\"
类似地,您可以找到 OHOS qpa 插件的所有依赖项,以确保您拥有所有必要的库。
修改 ets 中的初始加载
一旦复制了所有库,我们就可以修改 ets源代码,
在 DevEco 中打开 <deveco-project>:
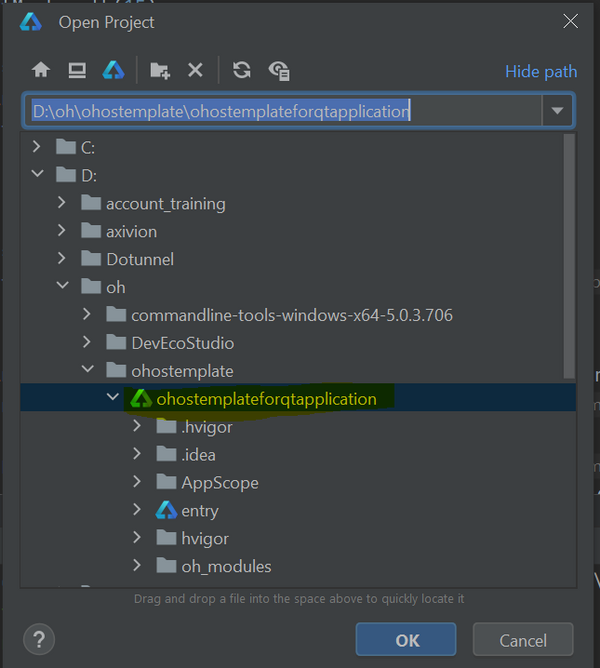
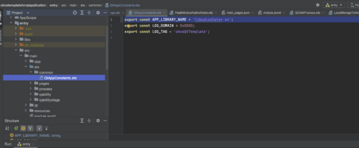
打开文件 <deveco-project>\entry\src\main\ets\common\QtAppConstants.ets。将 APP_LIBRARY_NAME 变量更改为我们要使用的库的名称(libcalculator.so):
构建并运行应用程序
确保设备已连接。连接后,它应该在 DevEco Studio 中可见。

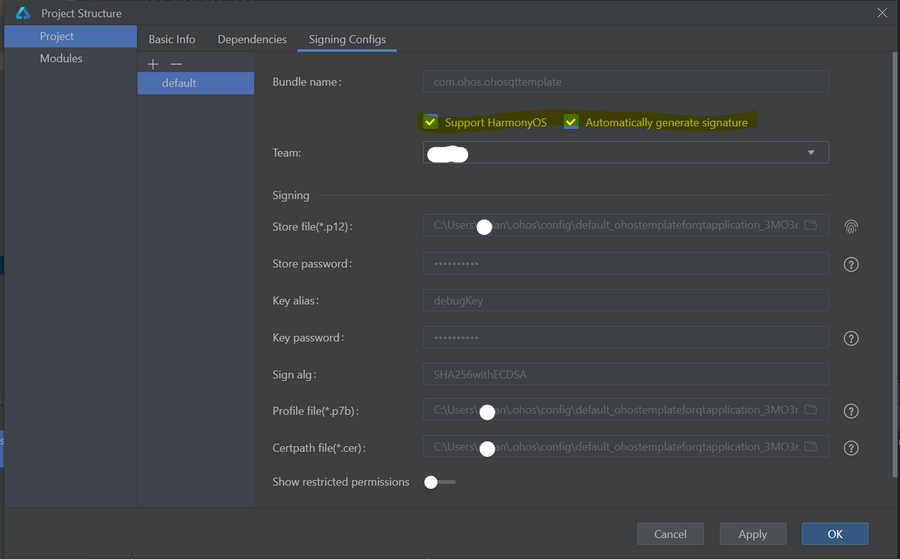
然后添加签名配置,打开 file--project structure--signing configs,勾选所有项,点击OK。
在 DevEco Studio 中选择设备后,您可以直接构建并运行应用程序:
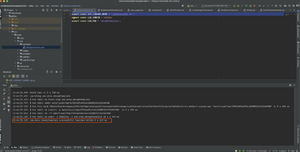
编译成功后,您可以看到应用程序在目标设备上正常运行。
