Setting Up Vale
Vale is a linter that highlights language issues such as grammar, terminology, and style issues.
Vale is available as an Extension for Qt Creator and Visual Studio Code.
This page helps you set up Vale on VS Code or Qt Creator.
1. Install Vale for Qt Creator
First, start Qt Creator (you need at least version 16.0) and enable the Extension Store.

Enable the "Use external repository" option and search for "Vale", and select the "Vale Language Server" Extension. On the right you can click "Install" to start installing the extension.
Once you open any text file, the extension will try to check for the actual Vale binaries and ask you to fetch data from the Internet.

If you allow this, it will next ask you to install the Vale binaries itself. You can click "Show Details" to check what exactly it wants to download.

Alternatively you can point the extension to your version of the Vale Language Server yourself via "Settings => Vale"

2. Configure Vale and Download Microsoft Style Guide Rules
We use the Microsoft Style Guide and a custom set of style rules relevant to Qt.
The Vale configuration and the style files are hosted in the qtqa.git repository, which is also a git submodule of the qt5.git. See Setting up Gerrit for more information.
First, clone the qtqa.git repository and the relevant directory is at qtqa/vale_linter_config. This directory contains the styles and configuration file for Vale. The branch "dev" should have the latest version.
Next, configure Vale by setting VALE_CONFIG_PATH to the directory of your .vale.ini. The .vale.ini file in the qtqa.git repository is at qtqa/vale_linter_config/.vale.ini
The following is an example of a .vale.ini file:
#Vale config for QDoc sources: C++, QDoc, QML, snippet files
StylesPath = styles
MinAlertLevel = suggestion
Packages = Microsoft
Vocab = Qt

#Add file extensions here.
[*.{cpp,qdoc,qml,qdocinc,js}]

#These are directories in the StylesPath. Turns on all rules in style
# Enable/disable each rule offered by the style
# Style.Rule = {YES, NO} to enable or disable a specific rule
Vale.Terms = YES
Vale.Avoid = YES
Microsoft.OxfordComma = YES
Microsoft.Passive = YES
Microsoft.Dashes = YES
Microsoft.Spacing = YES
Microsoft.Wordiness = YES
Microsoft.We = YES
Microsoft.OxfordComma = YES
Qt.Repetition = YES
Qt.Headings = YES
# Extends the built-in spell checker with additional filters
Qt.Spelling = YES
To test if Vale finds the configuration file, run:
vale ls-config
Vale should output the processed configuration in JSON format. Check that the JSON output corresponds to the values in the .vale.ini file.
Next, download the Microsoft Style Guide rules by running:
vale sync
This step is only necessary once after the initial qtqa.git clone.
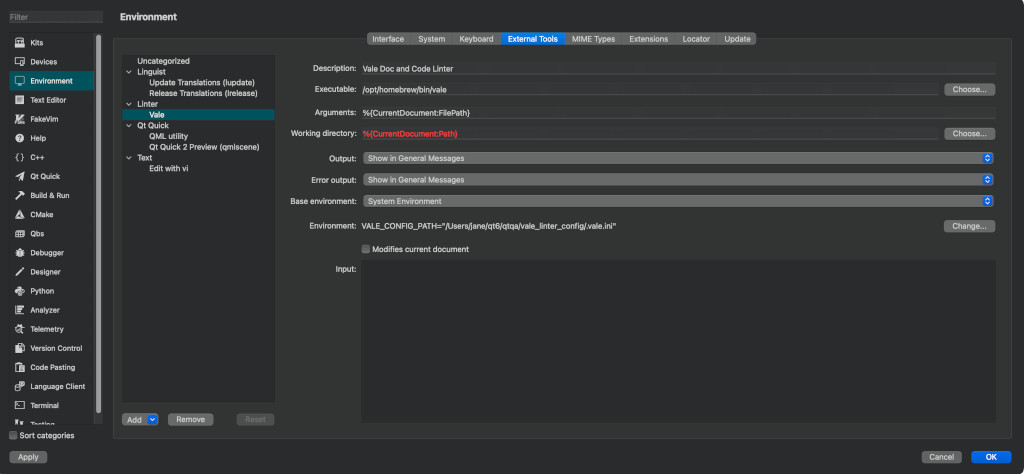
(Alternative) Configure Vale as an external Tool for Qt Creator
Creator can run Vale as an external tool.
- Set up Vale as an External Tool. For instructions, see https://doc.qt.io/qtcreator/creator-editor-external.html
- Set the VALE_CONFIG_PATH as the same directory as the one in the previous sections.
- Click Apply and OK.
- Run Vale as an External Tool.
The following image is taken in MacOS.
Configure Vale for VS Code
Vale is available as a VS Code extension from the Marketplace.
- Download and install Vale VSCode from VS Code Marketplace: https://marketplace.visualstudio.com/items?itemName=ChrisChinchilla.vale-vscode . Alternatively, download and install from within VS Code through the Extensions view.
- Restart VS Code
To test, open a source file and test out the linting features. Note that the file extensions are configured in the .vale.ini file.
